4. Accounts View
The accounts view is the main view for editing transactions. Here all accounts are listed and transactions for the selected account are displayed in a list or table. This view is always accessible by selecting its tab at the top of the application.
In order to better understand the accounts view, please note the following terms.
- Account
A collection of transactions recording a balance over time. Types of accounts included checking, savings, cash, investment, etc. Each account contains a list of credit or debit transactions with a specific amount and date/time of occurrence. Accounts are usually held with a financial institution
- Transaction
A record of assets or liabilities moving from one location (originator) to another (responder). Transactions usually occur between accounts of a buyer and seller but may also be a transfer between accounts of the same entity. All transactions should contain at minimum a date/time and amount field.
- Transaction Split
Part of a transaction that has been divided into several separate pieces with differing amounts. A single transaction can contain multiple splits. Splits are useful when a transaction originates from a single source but should be categorized more than one way.
- Field
The most basic representation of data within a transaction. Many different types of fields for date/time, amount, description, etc. make up a transaction.
4.1. Design & Layout
The accounts view shows a list or table of all transactions in the selected account. The list view shows transactions in a standardized but non-customizable way useful on small screen sizes. The table view shows transactions in a grid that allows customization including sorting, formatting and showing only certain fields.
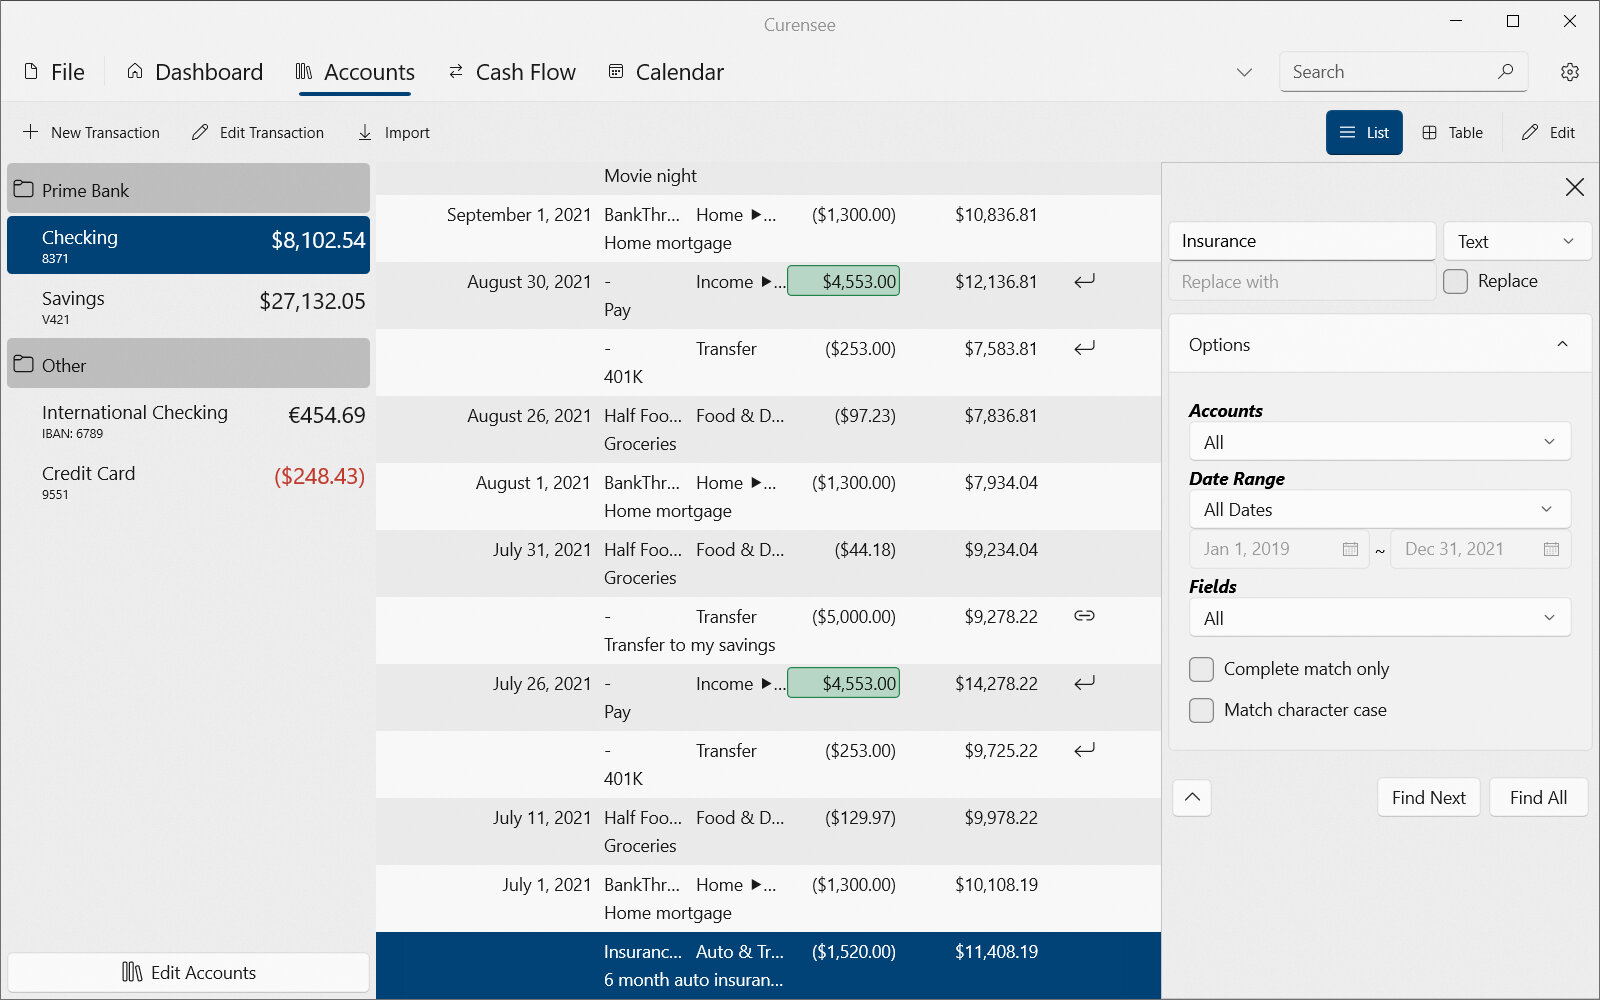
The accounts view can appear as shown in Fig. 4.1. In this example the list view is shown.
|
|---|

Fig. 4.1 Example accounts view with side panes¶ |
At the very top of the accounts view, above the main content area, is the command bar. The command bar contains actions useful when working with account transactions. On the far right-side of the command bar is the Edit button (which is available in most views). Pressing this button will open the edit menu which allows for editing accounts, reminders, fields and other primary data. For further information see Command Bar Actions in Actions.
On the left-side of the command bar shown in Fig. 4.1 are the buttons New Transaction and Import. Pressing New Transaction will create a new transaction and open the Transaction Editor. Pressing Import will open the transaction import overlay. Again, see Command Bar Actions in Actions for further information.
Of special note, on the right-side of the command bar, are the List and Table buttons used to switch between transaction views. The next sections explain in more detail the differences and use cases of the list and table views.
To the left in Fig. 4.1, there is a side pane listing all accounts. This list also highlights the selected account. Only the selected account’s transactions will be shown. It is possible to change the selected account by pressing on another account in the list. Changing the selected account will bring the corresponding account’s transactions into view.
Note
The list of accounts may not appear on the left as a side pane when the application window size is small. In this case, the list of accounts will be available from a drop down button at the top of the transactions area.
To the right in Fig. 4.1, a search side pane may appear when running an advanced search. Advanced searches are used to find transactions using specific parameters.
4.1.1. List View
The list view is the default view and shows all transactions in the selected account ordered by date. An example of the list view is shown in Fig. 4.2. Remember that the left side pane contains the list of all accounts.
|
|---|
|
Fig. 4.2 Accounts list view¶ |
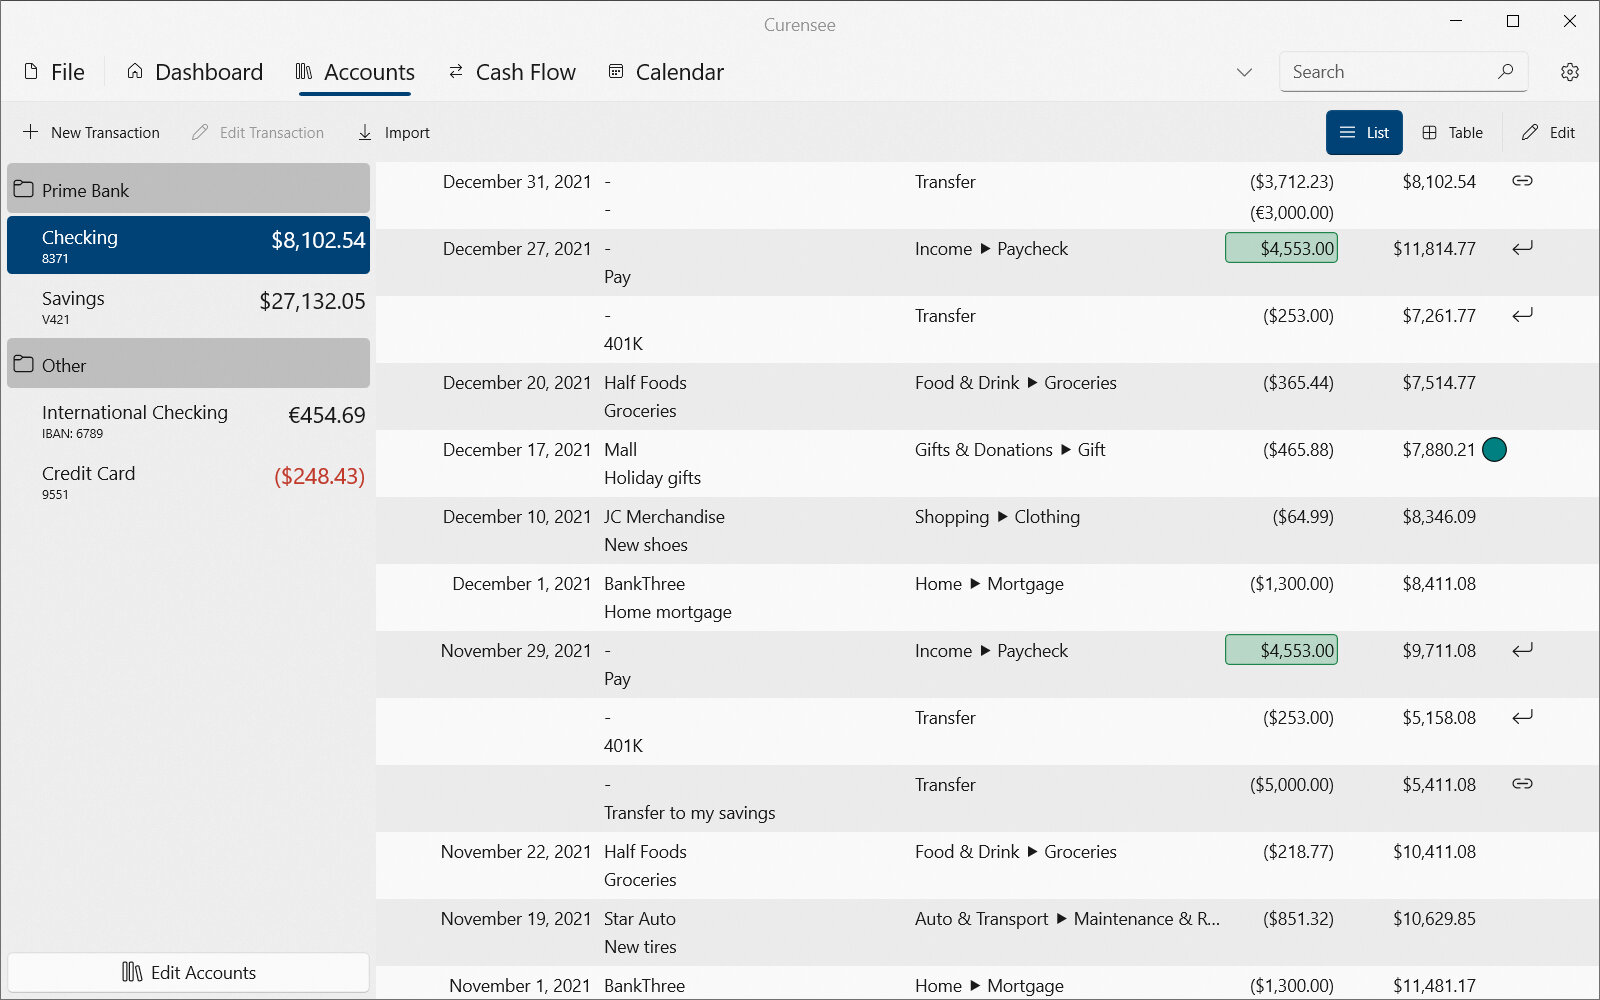
The newest transaction will appear at the top of the list and the oldest at the bottom. The list automatically shows category, payee, description, amount and symbols indicating if the transaction is split, part of a transfer, etc. The list view is not customizable and ordering of transactions is fixed. Summarizing, the list view has the following features:
A list of transactions ordered by date from newest (at the top) to oldest (at the bottom).
Display of date, category, payee, description and amount for each transaction.
Positive transaction amounts will be colored green. A running balance for the account is also shown to the right of the amount. Any foreign amount will be shown immediately below the amount in the accounts local currency.
A list of symbols indicating if the transaction is split, part of a transfer, valid, etc. is shown next to each transaction or split.
Note
Not all transactions in the list view may show a date. If a date is missing, that transaction has the same date as the transaction(s) above. This is done to visually group transactions together that occurred on the same day.
As mentioned above, next to each transaction there may be some symbols. These symbols provide a quick visual indication of the following:
Symbol |
Name |
Description |
|---|---|---|
|
Split |
The transaction is split. |
|
Linked |
The transaction is linked to another transaction. Both transactions together represent a transfer. |
|
Valid |
The transaction is invalid for any number of reasons. This is most common with invalid field data such as an undefined category. |
|
Locked |
The transaction has been locked from future editing. |
|
Located |
The transaction contains geographic latitude and longitude coordinates and can be shown on a map. |
|
Hidden |
The transaction is normally hidden and is only visible when showing all hidden transactions. |


4.1.2. Table View
Attention
Some or all of this functionality may not be available on certain platforms or may require an additional feature upgrade. Feature upgrades are available as in-app purchases on supported platforms.
Note
On small screen sizes the table view is disabled and only the list view is supported.
The table view shows all transactions in the selected account; by default, ordered by date. Unlike the list view, the order of transactions can be changed in the table. An example of the table view is shown in Fig. 4.3. Remember that the left side pane contains the list of all accounts.
|
|---|
|
Fig. 4.3 Account table view¶ |
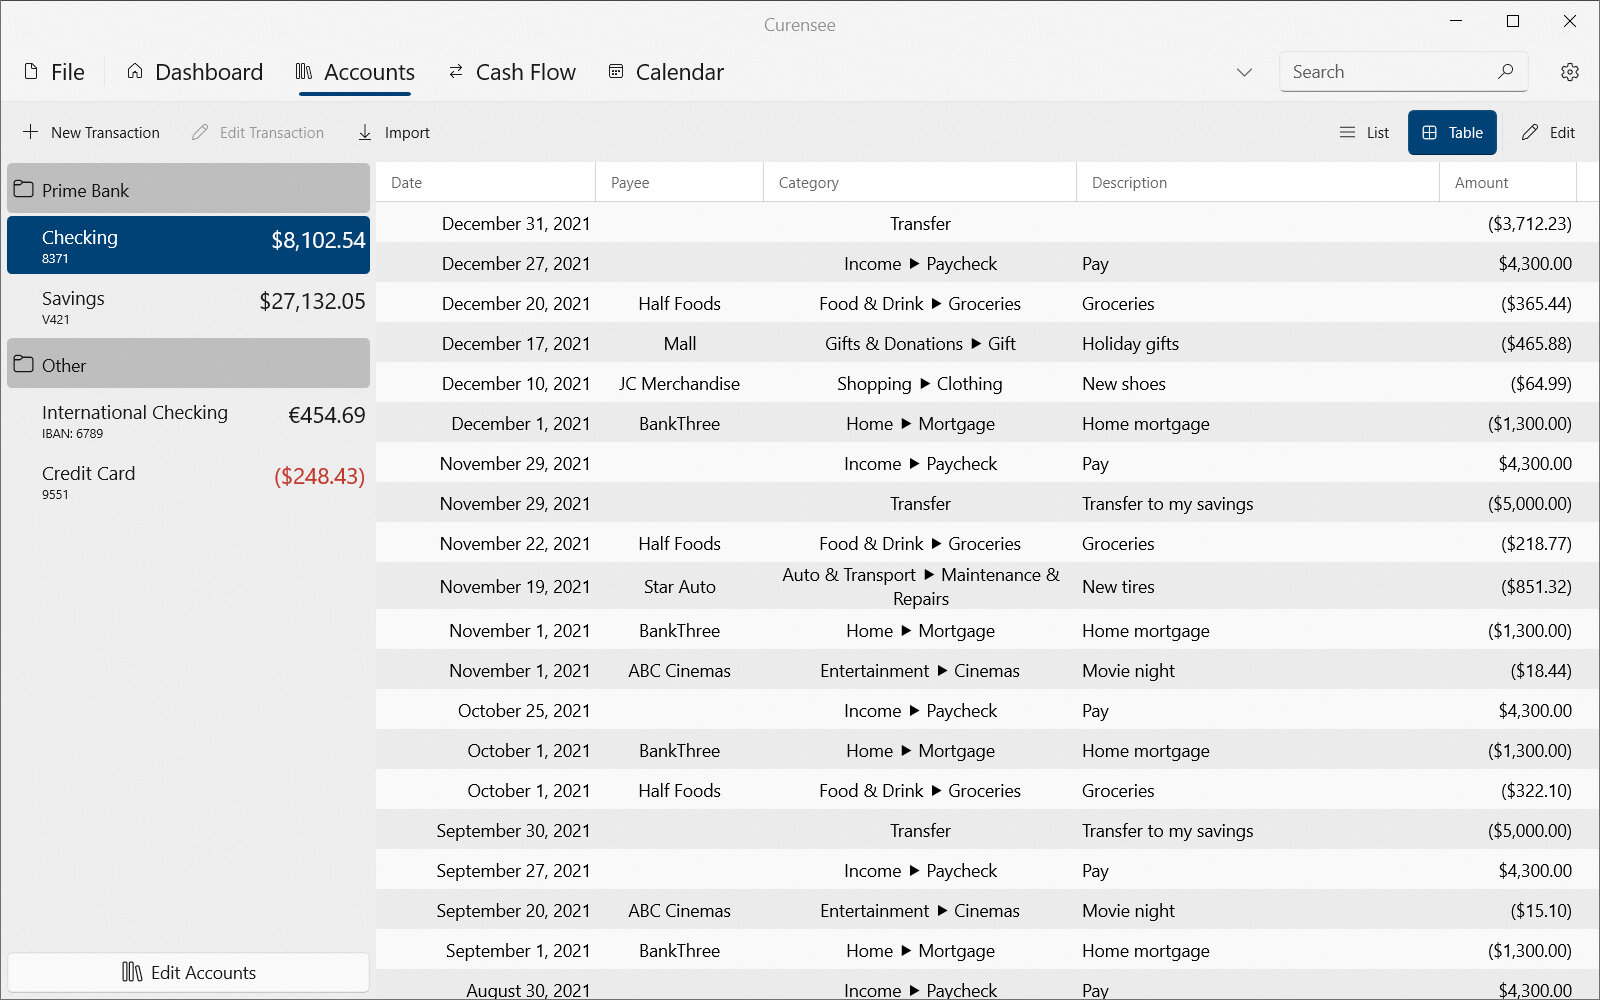
The fields shown as the columns in the table can be customized for each account. In order to sort the account by field, simply press the column header. Unlike the list view, the table view does not show the running account balance, foreign amount or a list of symbols for special transaction properties. Summarizing, the table view has the following features:
A table of transactions with customizable sorting.
Display of any transaction fields. Only the desired fields can be shown.
Sorting by any displayed field by pressing on its column header.
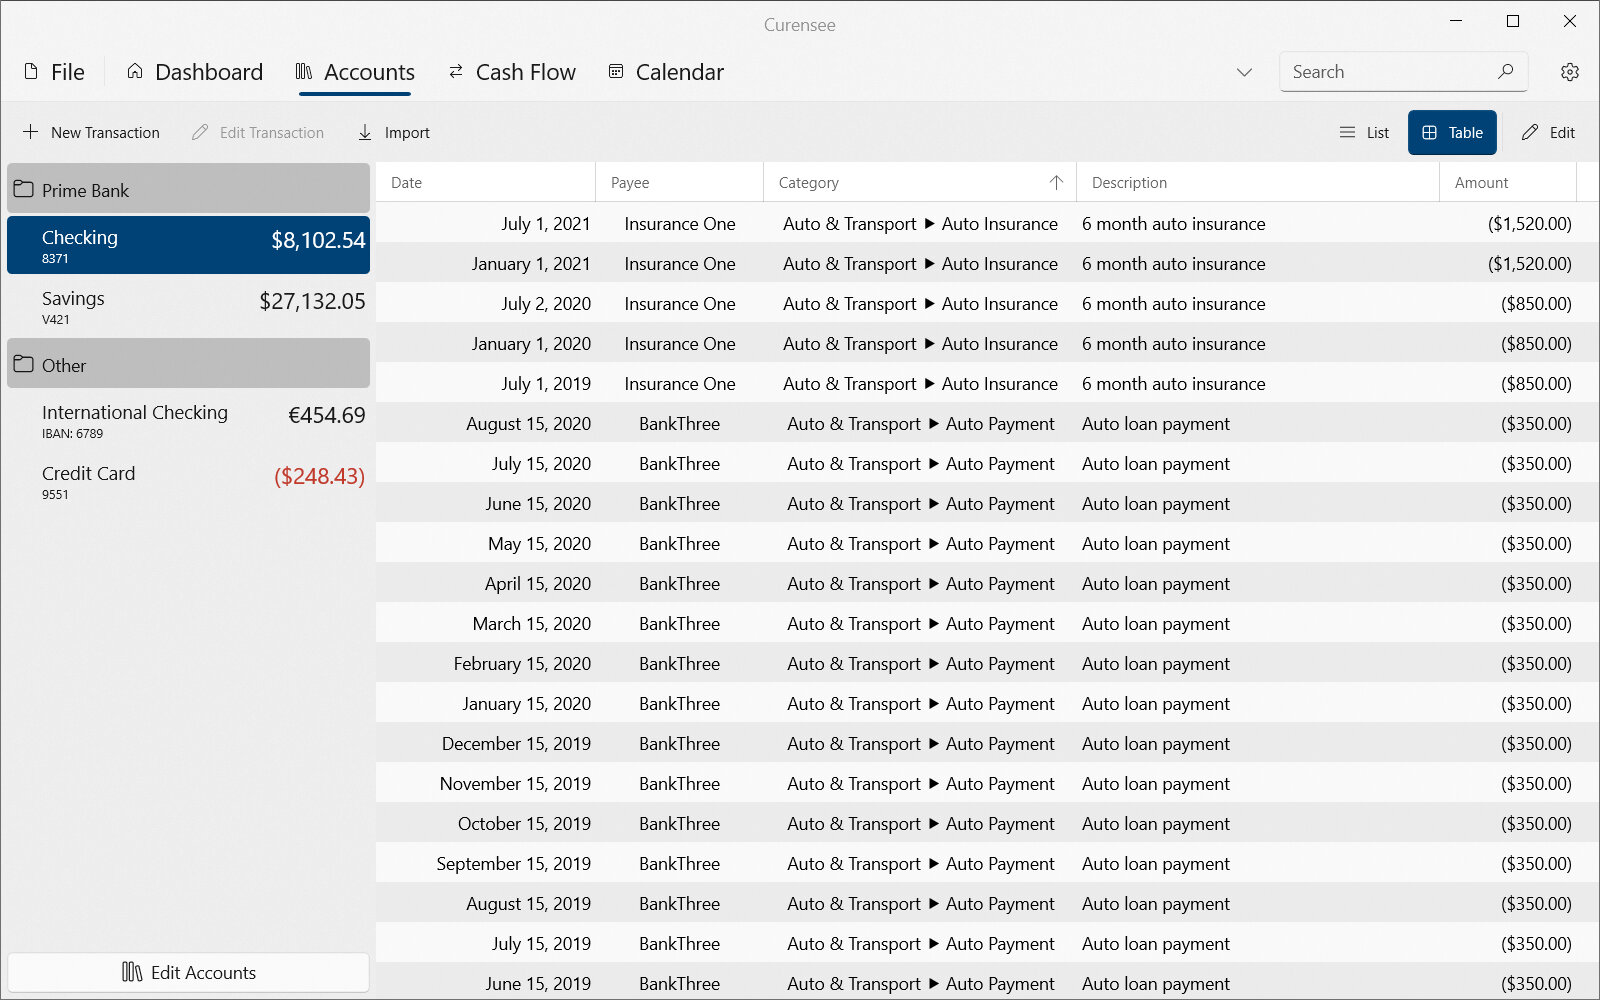
The table view is most useful to sort transactions. Sorting transactions allows for grouping to quickly find all transactions that have similar values. In order to sort transactions, press the column header of the field to sort. Pressing once will sort in ascending order, twice descending and a third time will clear any sorting and return to the default order. An example of the table view with sorted transactions by ‘Category’ in ascending order is shown in Fig. 4.4.
|
|---|
|
Fig. 4.4 Accounts table view - sorted¶ |
4.2. Actions
The accounts view has the following actions. These actions are primarily accessible from the top command bar just below the view tabs. However, additional actions for the transaction menu are described below.
4.2.1. Command Bar Actions
Icon |
Action |
Description |
|---|---|---|
|
New Transaction |
Creates a new transaction for the selected account and opens the Transaction Editor. |
|
Edit Transaction |
Opens the currently selection transaction in the Transaction Editor. |
|
Import |
Open the transaction import overlay to start the process of importing transactions directly from a bank or from a file. |
|
List |
Switches to the List View for displaying transactions. |
|
Table |
Switches to the Table View for displayed transactions. |
|
Edit |
Opens the Edit Menu. See the Edit Menu section below for more details. |
Edit Menu |
||
|
Accounts |
Opens the accounts editor. See the Accounts Editor section for more details. |
|
Budgets |
Opens the budgets editor. See the Budgets Editor section for more details. |
|
Reminders |
Opens the reminders editor. See the Reminders Editor section for more details. |
|
Fields |
Opens the transaction field definitions editor. See the Field Definitions Editor section for more details. |
|
Transaction Templates |
Opens the transaction templates editor. See the Transaction Templates Editor section for more details. |


4.2.2. Interactive Transaction Actions
Attention
Some or all of this functionality may not be available on certain platforms or may require an additional feature upgrade. Feature upgrades are available as in-app purchases on supported platforms.
Transactions have a contextual menu of actions. To open this menu, right click on a transaction or long press it. The transaction menu includes actions use to modify the selected transaction, create a new transaction, change the selection and export the selection to a file.
Icon |
Action |
Description |
|---|---|---|
Selected Transaction Actions |
||
|
Edit |
Opens the selected transaction for editing in the Transaction Editor. |
|
Copy |
Copies the selected transaction. The copied transaction will open in the Transaction Editor. |
|
Copy To |
Copies the selected transaction into another account. The account to copy into will be selectable. The copied transaction will open in the Transaction Editor. |
|
Delete |
Deletes the selected transaction. A warning will appear before deleting the transaction. |
|
Go To Transfer |
Navigates to the transaction linked to the selected transaction as a transfer. |
Global Actions |
||
|
New |
Creates a new transaction for the selected account and opens the Transaction Editor. |
Selection |
A parent menu entry that includes the selection actions. See the Selection Actions section below for more details. |
|
Selection Actions |
||
|
Select All |
Selects all transactions in the selected account. |
|
Select None |
Clears all selected transactions. The selected account won’t change. |
|
Export to CSV |
Exports all selected transactions to a Comma Separated Values (CSV) file. A file dialog will be shown allowing to save to a specific location. |


