8. Transaction Import
Importing transactions is one of the most important processes. Transactions contain all the information that powers the visualization and reporting capabilities such as the dashboard and cash flow diagram. Transactions can be added one at a time using the transaction editor; however, that is very time consuming. Instead, it is better to download files from a financial institution which contain transactions for an account. Curensee can then read these files and add multiple transactions at once.
Curensee supports the file types listed below. Press each file type name to go to the corresponding Wikipedia article.
Note
Automatic transaction download from financial institutions is currently not supported. Transaction data must be downloaded from your online accounts and imported using the below process. This ensures maximum compatibly with your transaction data (as not all financial institutions are supported for transaction download) and also ensures your data always stays with you – it is never processed by a third party or stored in the cloud.
Importing is done as a sequence of steps to make the process easier to follow. Each step takes up its own view with associated parameters and options. An example of the complete import process is shown in Fig. 8.1. The next sections contain instructions for each step of the import process.
|
|---|

Fig. 8.1 Import example¶ |
Advancing to the next or previous steps is possible using the actions listed below. These actions are always available at the bottom of the import view.
Icon |
Action |
Description |
|---|---|---|
|
Back |
Pressing the Back button moves to the previous step in the import process. This allows changing past parameters or options. This action is not available while in the first step. |
|
Next / Import |
Pressing the Next button moves to the next step in the import process. Any parameters in the current step will be applied before moving to the next step. This action is renamed to Import before moving to the last step. |
|
Cancel |
Pressing the Cancel button immediately closes the import view. |


8.1. Step 1: Select Source File
The first step in the import process (shown in Fig. 8.2) reads the user-specified source file preparing it for import. The source file must be selected using one of two methods.
Pressing Select File to open a file selection dialog. The file selection dialog is used to navigate the device’s file system and select the file to import.
Dragging and dropping a compatible file within the Drop File Here area.
|
|---|
|
Fig. 8.2 Select source file¶ |
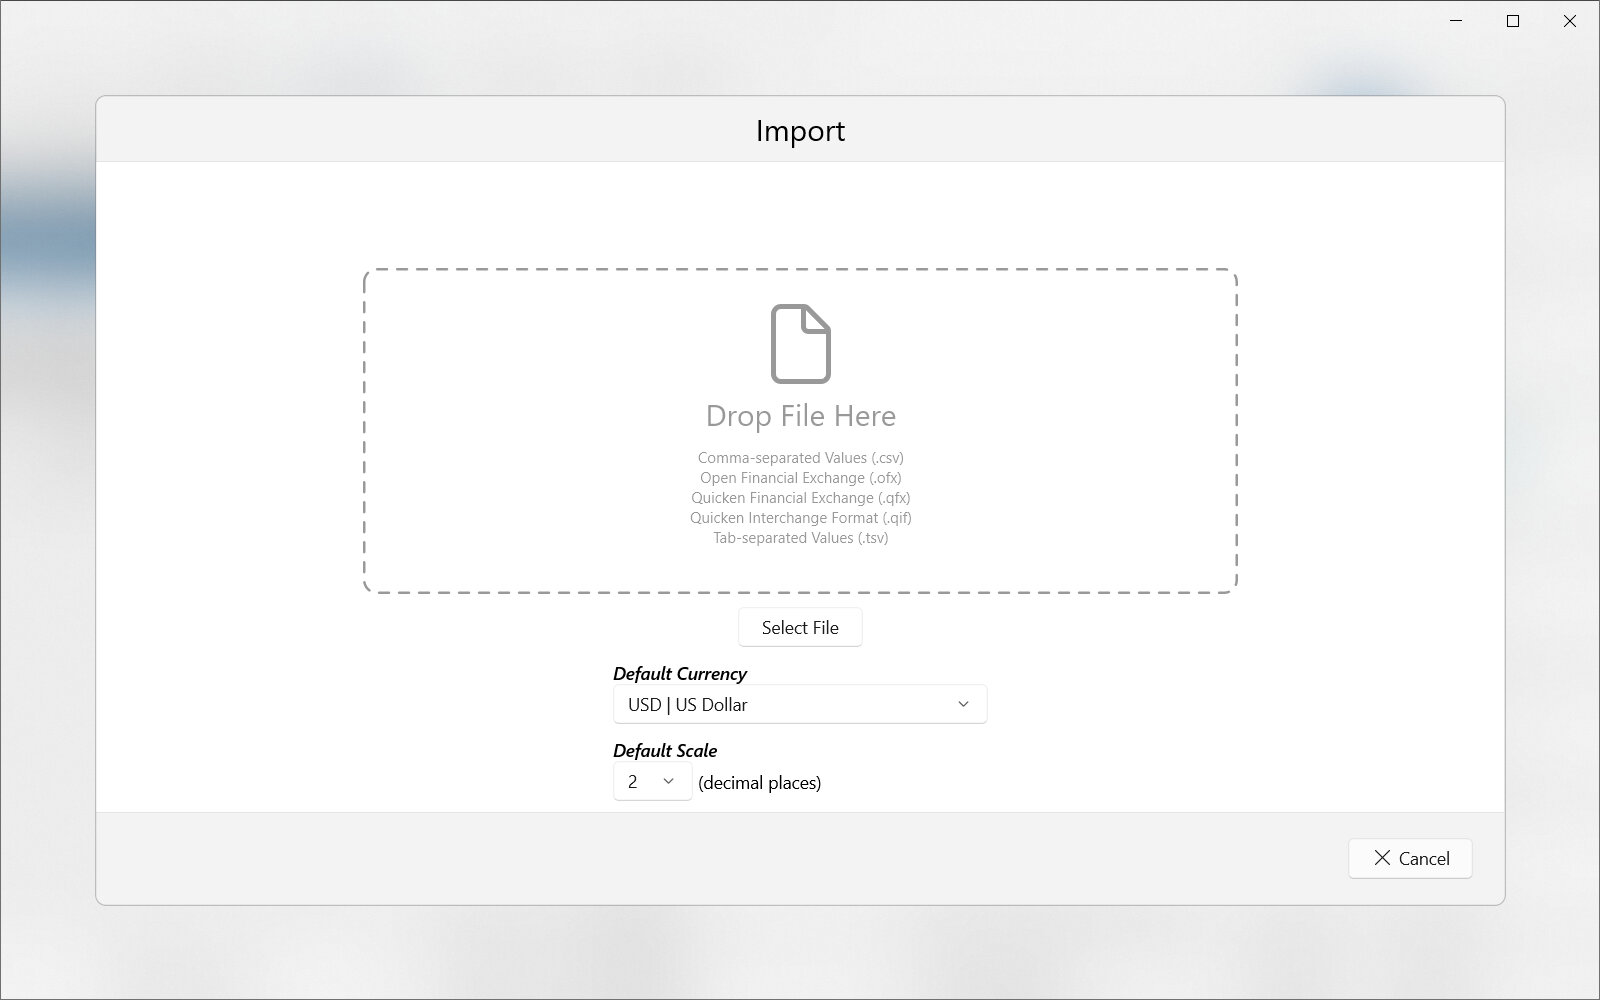
This step has the parameters listed below which are used to control how the file is read.
- Default Currency
Defines the default currency code for currency amounts where it is not otherwise specified.
- Default Scale
Defines the default currency scale (number of decimal places) for currency amounts where it is not otherwise specified.
Important
Some file types, such as comma-separated values (CSV), do not contain currency code and scale information. In order to successfully read the file, and convert numerical values into currency amounts, both Default Currency and Default Scale must be specified at the time of reading the file.
Advancement to the next step is automatic after the source file is successfully read. If the selected source file cannot be read correctly, an error is shown and a different file must be selected.
Note
Both Next and Back buttons are not available in this step. It’s not possible to go backwards from the first step and the app will automatically advance to the next step as soon as a file is read successfully.
8.2. Step 2: Select Accounts & Field Mapping
The second step in the import process (shown in Fig. 8.3) is used to specify which account will be the transactions source as well as which pre-existing account in Curensee will be the destination. It’s especially important to specify how to read the transaction fields translating between the source and destination accounts (field mapping).
|
|---|
|
Fig. 8.3 Select accounts & field mapping¶ |
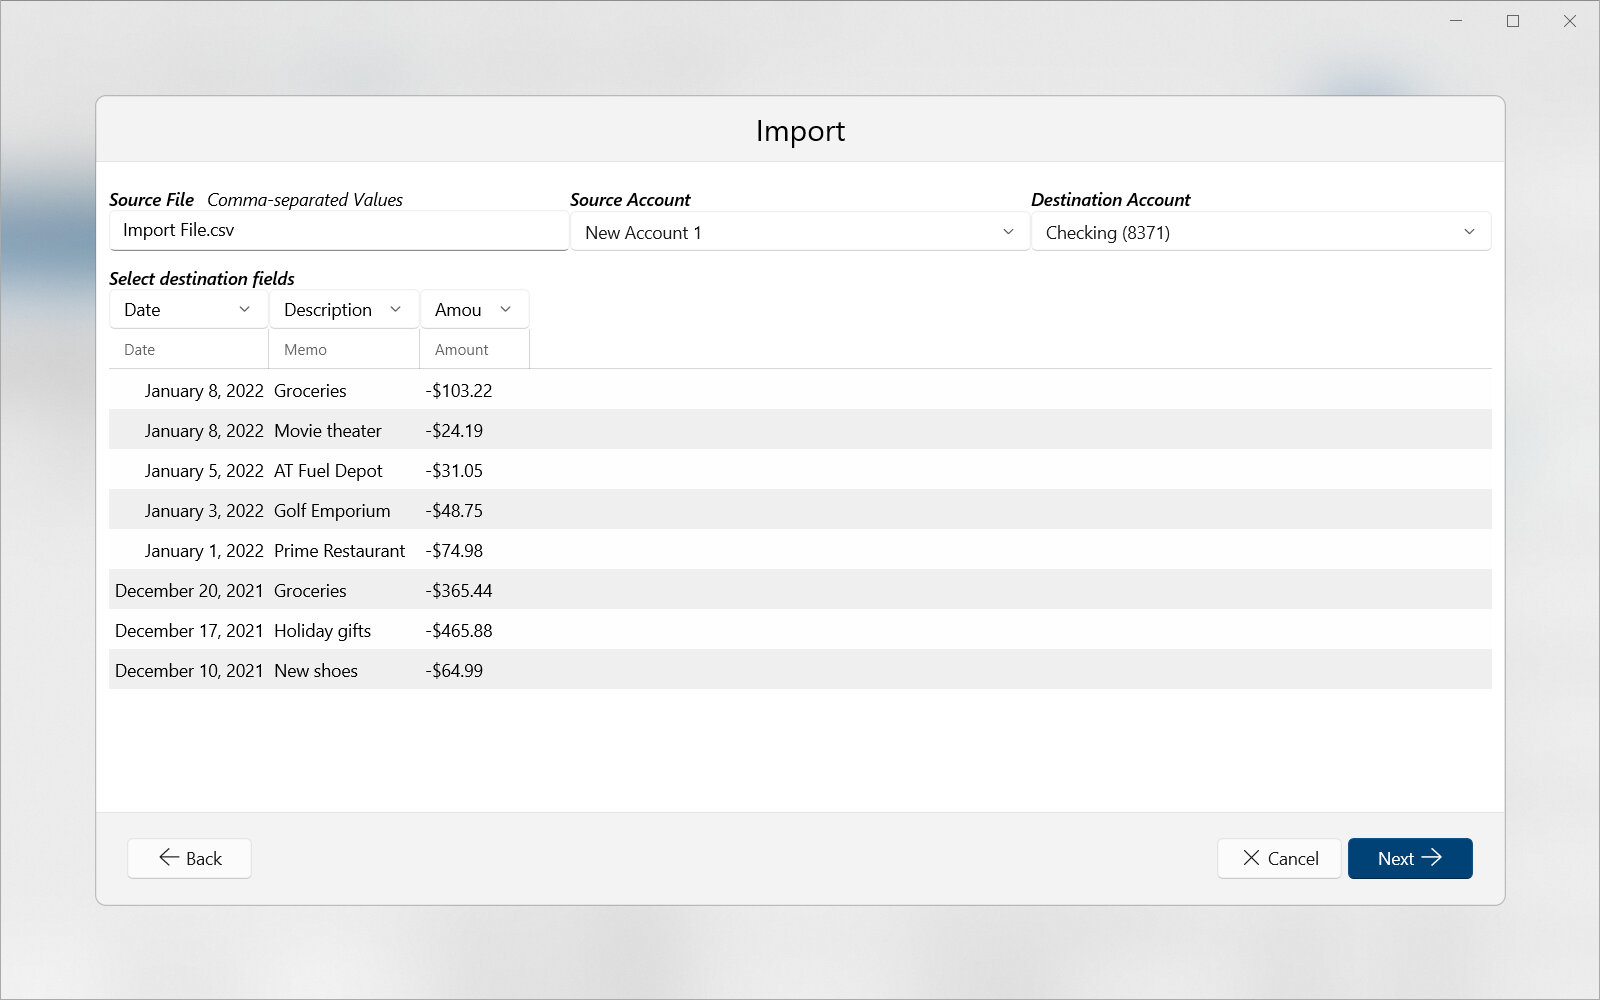
This step has the parameters listed below which are used to control how transactions are read from the source account and where they should be placed during import.
- Source File
Shows the source file name and type. This cannot be modified in this step and is only informational. Go back to the previous step to change the source file.
- Source Account
Specifies which account in the source file contains the transactions to import. Not all source files will have multiple accounts so selecting the source account may not always be possible.
- Destination Account
Specifies the destination account where imported transactions will be placed. This account must be selected from pre-existing accounts in Curensee.
- Select Destination Fields
Specifies the mapping between the source account’s fields and the destination account’s fields. The source account’s fields will already be defined and shown as column headings in the transaction preview table. Above each column is a drop down allowing for a destination field to be selected for each source field. Only fields of a compatible data type will be allowed as a destination.
Important
Field mapping (selecting destination fields) is important to understand. It is used to specify which field(s) in the source account’s transactions correspond to which field(s) in the destination account’s transactions. Ensuring field mappings are correct is important for imported transactions to be interpreted correctly. Field mappings will be automatic or guessed for certain file types; for others, the user must specify them.
To advance to the next step, press the Next button on the bottom right of the import view. It is also possible to return to the previous step by pressing Back on the bottom left.
8.3. Step 3: Select Options
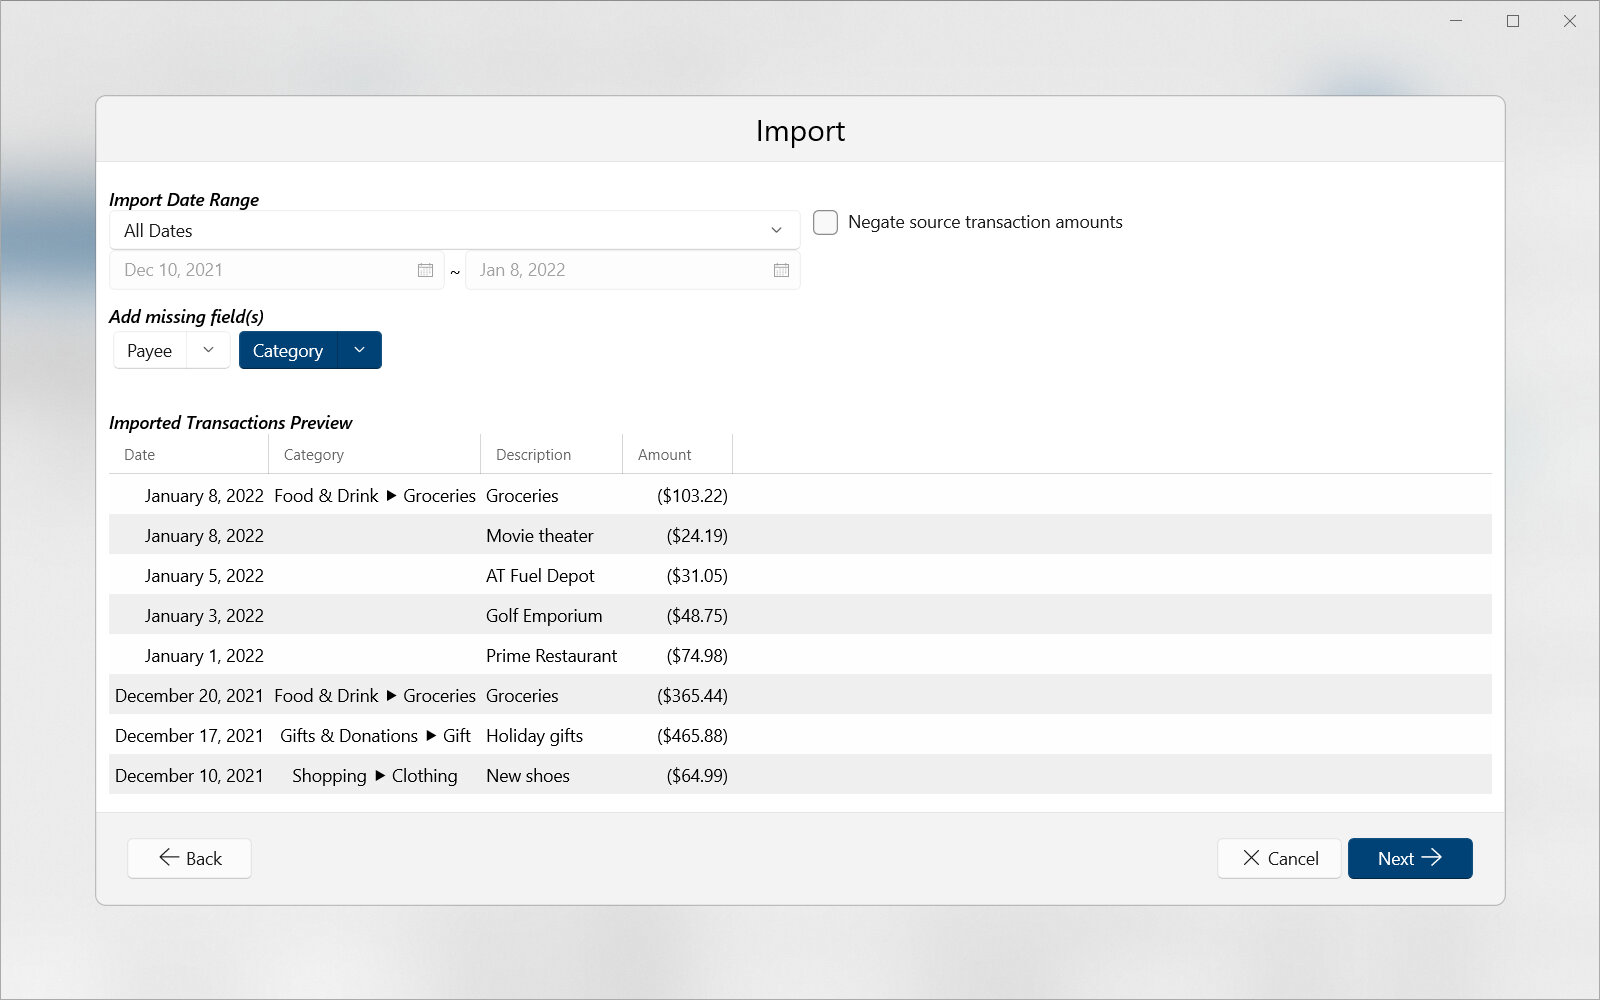
The third step in the import process (shown in Fig. 8.4) is used to edit several options which can modify source transactions before import. These options can be used to exclude transactions based on their date, fix transaction amount sign or add missing fields such as category.
|
|---|
|
Fig. 8.4 Select options¶ |
This step has the options listed below which are used to modify the source transactions before import.
- Import Date Range
Specifies the range of transaction dates to import. Transactions outside of the specified date range will not be imported. For further details on how to select a date range see Date Range Picker.
- Negate source transaction amounts
Specifies whether the source transaction amounts should be negated. For example, amounts of +$10.00 will be changed to -$10.00. This is useful for some credit card transactions which following banking instead of more common rules (negative for expenses, positive for income is the common rule).
Note
Only the primary amount field’s currency value will be negated. The primary amount field will be whichever field is defined as such in the destination.
- Add missing fields
Some fields may not exist in the source transactions to import. This is usually category or payee values. Curensee can predict the values for missing fields based on existing transactions.
Hint
The imported transaction preview table is always visible at the bottom of this view. Changing options above will automatically update the preview table.
To advance to the next step, press the Next button on the bottom right of the import view. It is also possible to return to the previous step by pressing Back on the bottom left.
8.4. Step 4: Merge Duplicate Transactions
The fourth step in the import process (shown in Fig. 8.5) is used to control how possible duplicate transactions are merged. Transactions will automatically be matched by date and amount and a list of potential duplicates shown. For every possible duplicate, the source transaction is listed allowing the user to specify which, if any, destination transaction to replace.
Note
Merging duplicate transactions is only required if Curensee detects matches. If no duplicate transactions are detected, a message similar to “Good news, no matching transactions were found.” will be displayed and it’s safe to continue and finish importing transactions by pressing Import.
|
|---|
|
Fig. 8.5 Merge duplicate transactions¶ |
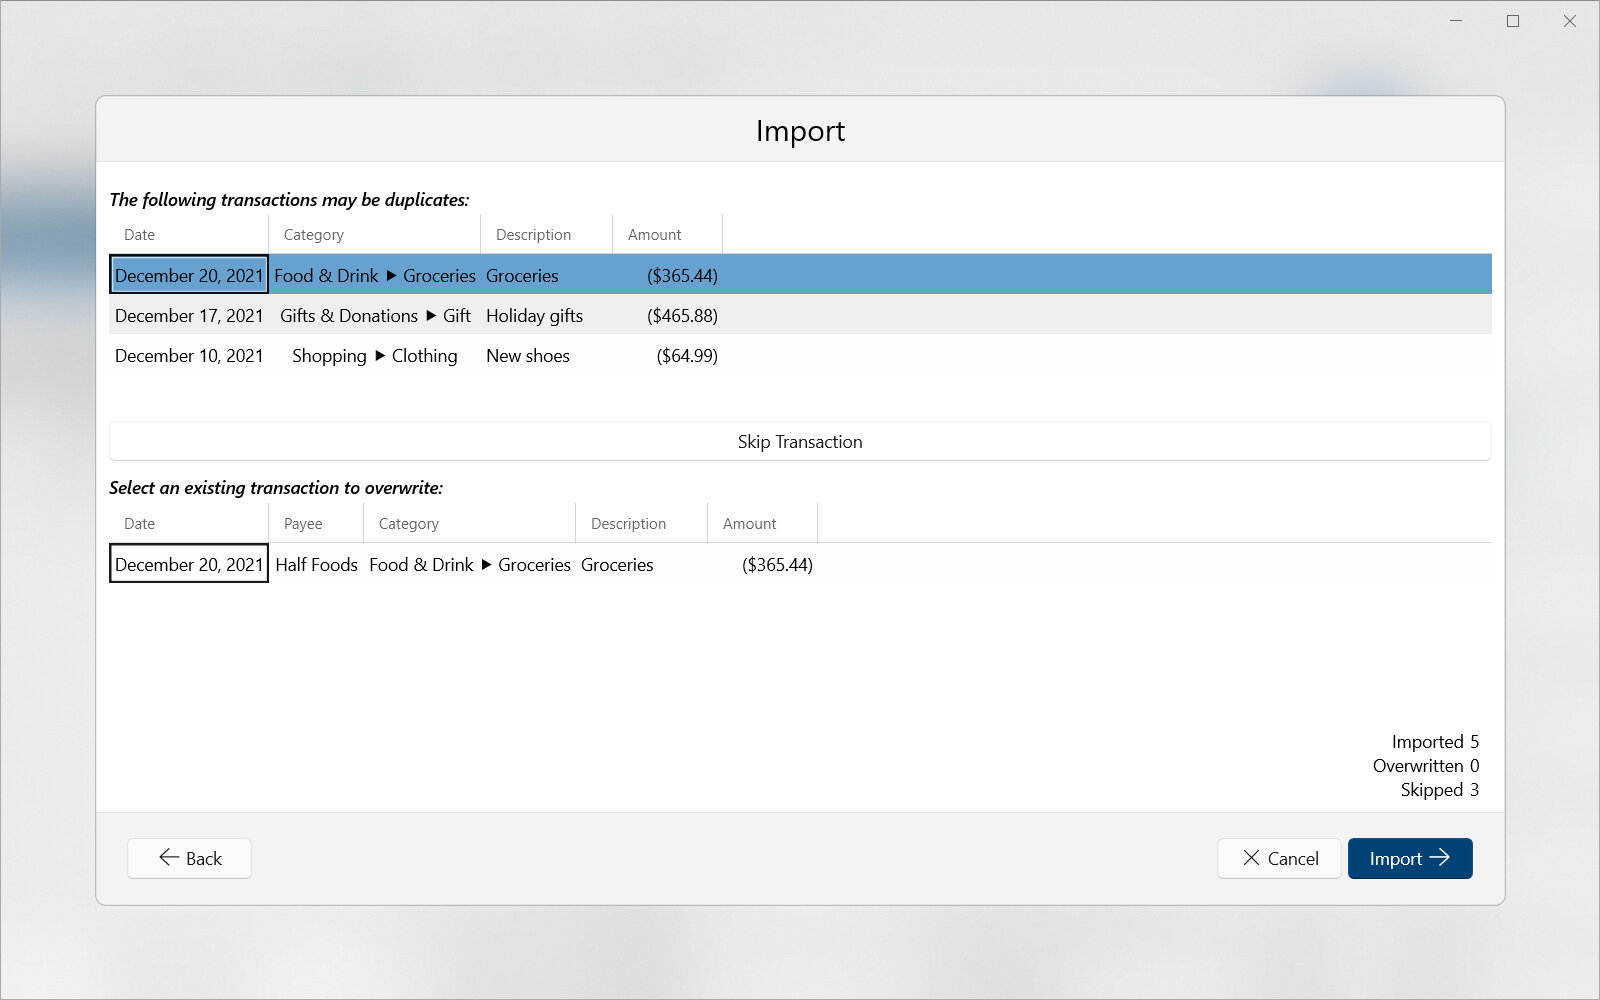
This step has the options listed below which are used to control how possible duplicate transactions are handled. At the top of the view is a list of source transactions that are potential duplicates. At the bottom is a list of potential matching destination transactions that can be overwritten. There is also an option to skip the source transaction.
One-by-one each source transaction in the top list should be selected and one of two options applied: (1) overwrite an existing destination transaction or (2) skip the transaction. These options are available under the heading Select the existing transaction to overwrite.
- Selected Source Transaction
Specifies which source transaction is active to apply merge options. The selected source transaction is highlighted in the top list of transactions under the heading The following transactions match with existing transactions. This list includes all transactions in the source account that are possible duplicates of transactions already in the destination account.
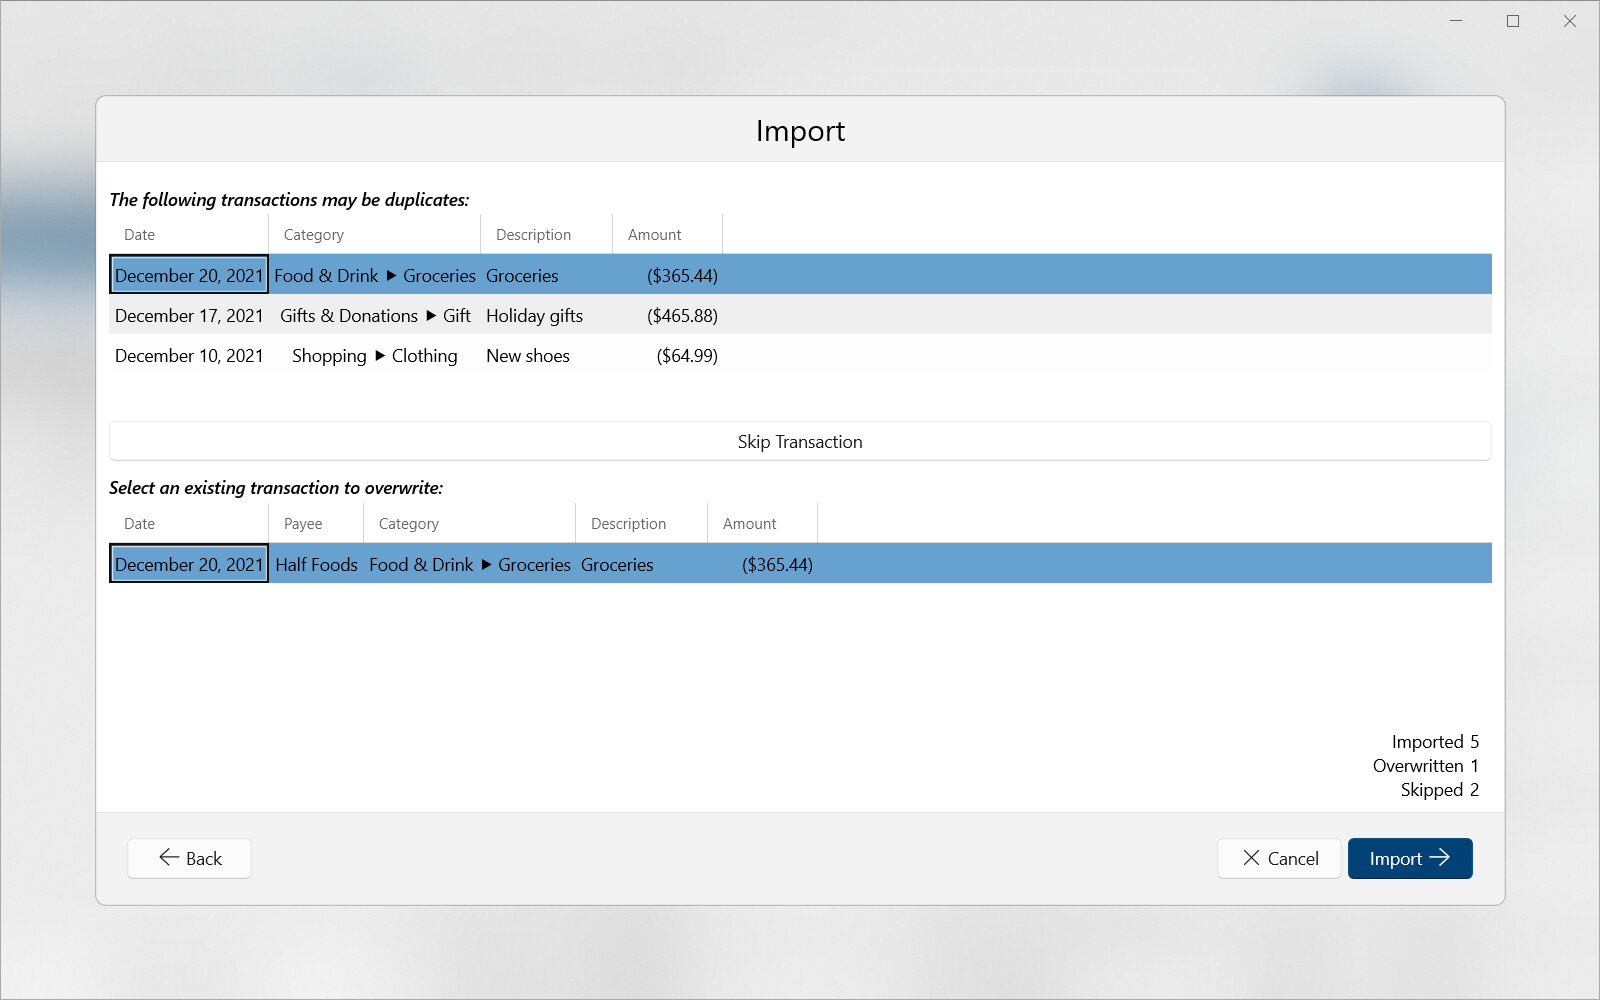
- Overwrite
To overwrite an existing destination transaction, select a matching destination transaction from the bottom list. The list will contain all existing transactions in the destination account that are possible matches to the selected source transaction. An example of selecting this option is shown in Fig. 8.6.
|
|---|
|
Fig. 8.6 Overwrite destination transaction¶ |
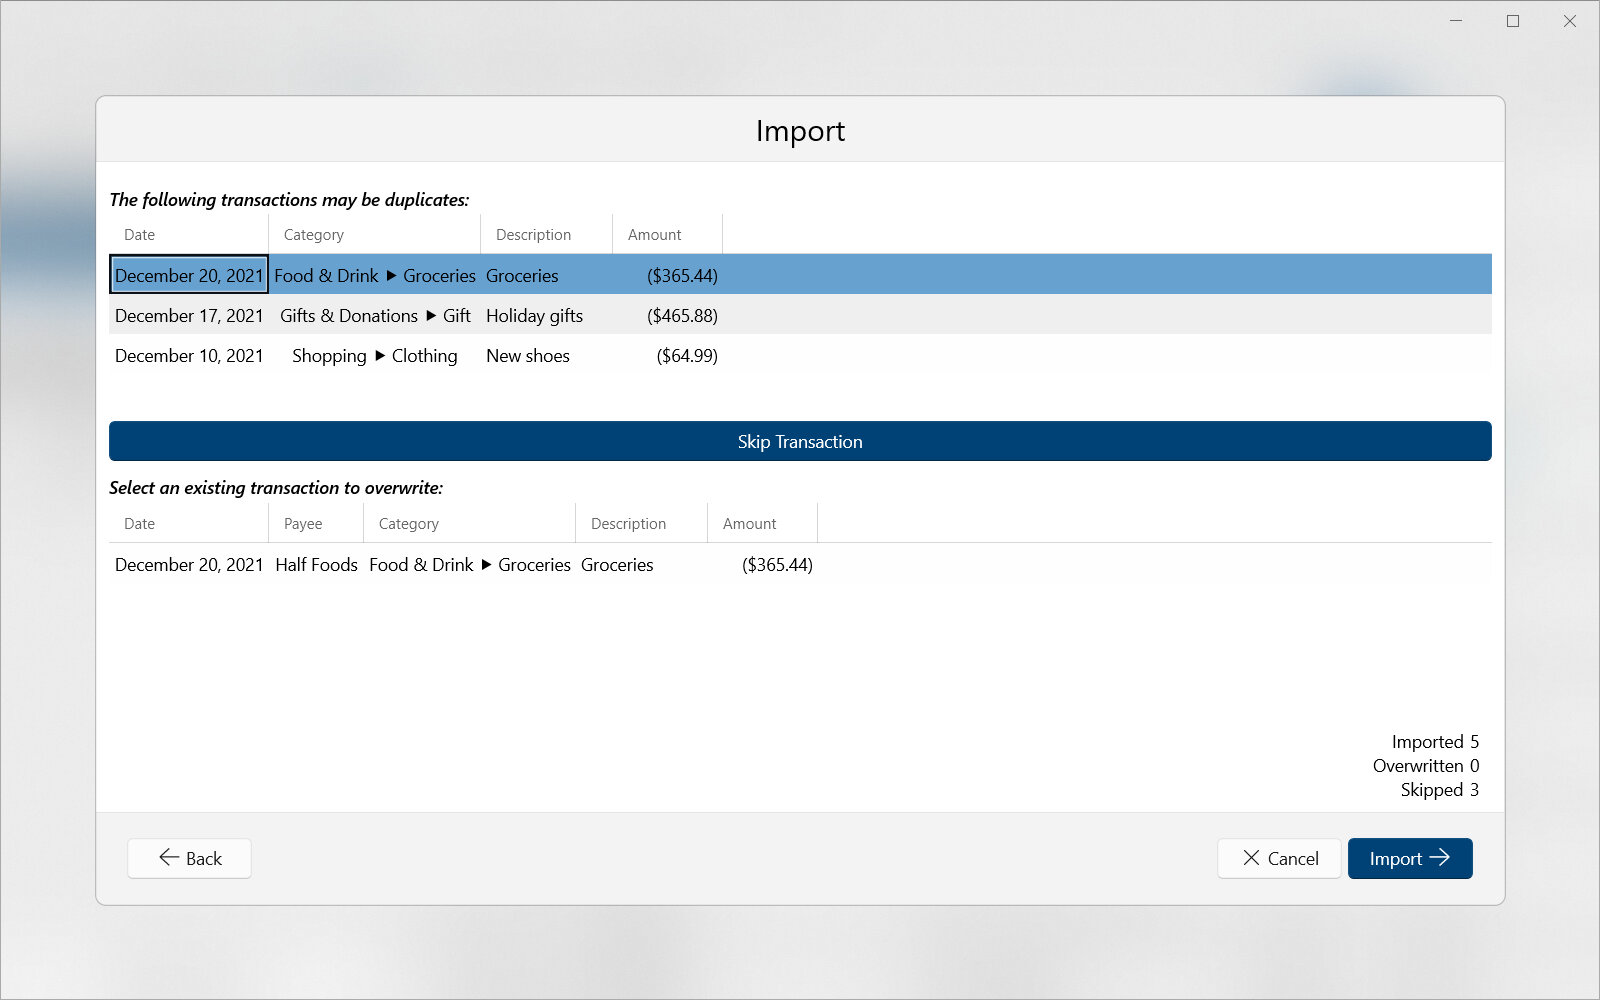
- Skip
To skip the source transaction, and not import it into the destination account, press Do Not Overwrite (Skip). The transaction will be skipped when this option is highlighted. An example of selecting this option is shown in Fig. 8.7.
|
|---|
|
Fig. 8.7 Skip source transaction¶ |
Hint
An import summary is shown above the Import button. This summary includes the destination account as well how many transactions will be imported, overwritten or skipped. It’s a good idea to double check this summary before importing.
After a selection is made for all possible duplicate matching transactions, it’s time to move to the next step. To advance to the next and final step, press the Import button on the bottom right of the import view. It is also possible to return to the previous step by pressing Back on the bottom left.
8.5. Step 5: Import
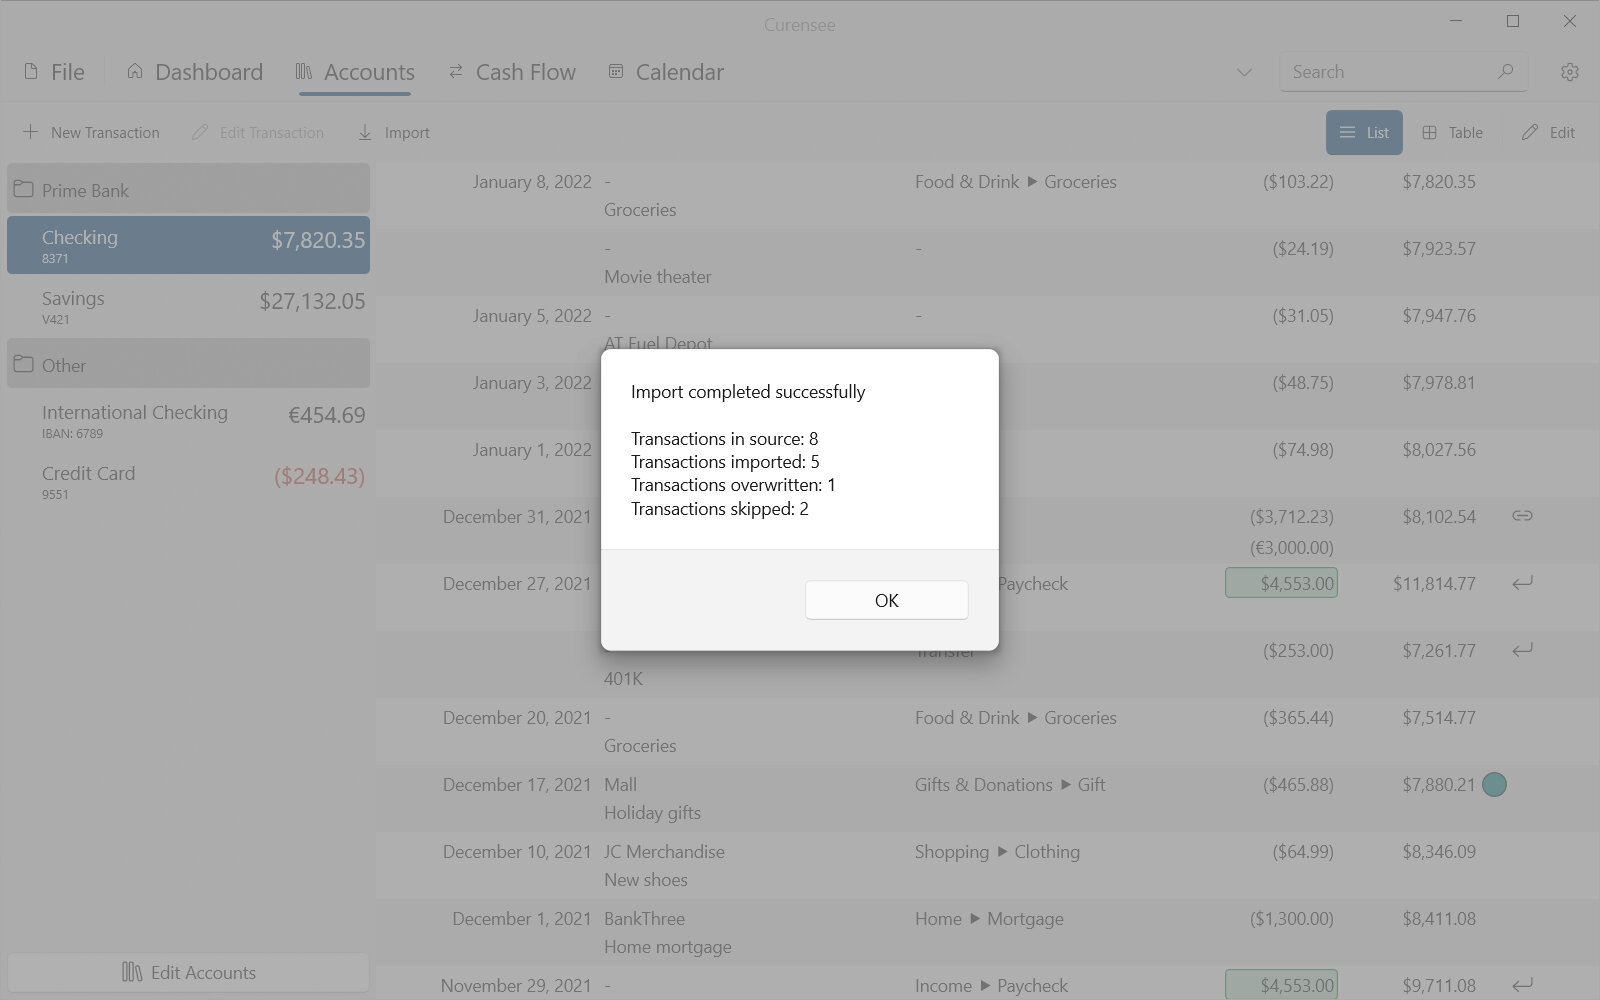
After Import is pressed in the previous step, the source transactions will be imported. This process can take a few moments to complete. Once complete, a message will be displayed showing a brief summary of the import. An example of this message is shown in Fig. 8.8.
Note
A warning will appear if matchings transactions were detected but the user didn’t specify how to handle each one individually. It is generally safe to continue by pressing Yes and by default all matching transactions will be skipped and not imported.
|
|---|
|
Fig. 8.8 Import complete¶ |