7. Editors
Editors are used to modify data or properties of an item. There are several different types of items including accounts, budgets or transactions that each have their own editor. This section describes all editor types and how they can be used.
7.1. Common Design & Layout
Except for the transaction editor, all editors have the same basic design shown in Fig. 7.1. An editor is usually an overlay shown on top of the current view. However, if the application window size is small, an editor will size to the entire window.
|
|---|

Fig. 7.1 Example of an editor overlay¶ |

On the left side of the editor is a collection including both items and groups. A group contains a list of items or other child groups (hierarchical). Each item may be an account, budget, reminder, etc. depending on the editor type (see each section below).
Hint
Groups are useful to logically arrange several different items together in the collection. For example, a group can be used to associate all accounts from the same financial institution.
Note
The ordering of items in the editor’s collection is used wherever items are listed in the applications. For this reason, it is best to order and arrange items as clearly as possible. For example, sort all accounts by alphabetical order or group them by type or financial institution.
On the right side of the editor is the list of all properties that can be modified for the selected item or group. When a group is selected, only the name may be modified. When an item is selected several different properties can be modified. The list of properties is usually broken up into several sections that can be expanded/collapsed to save space. See each editor type below for details on modifying these item-specific properties.
7.2. Common Actions
All editors (except for the transaction editor) share the following actions. These actions are useful to modify or re-order the collection of items/groups and save or cancel changes in the editor itself.
Icon |
Action |
Description |
|---|---|---|
Collection |
||
|
Add Item |
Adds a new item (whether account, budget, reminder, etc.) to the collection. |
|
Remove Item |
Removes the selected item or group. If a group is removed all items within that group are also removed. Warning: Data will be lost if items or groups are removed and then Save is pressed. |
|
Add Group |
Adds a new group to the collection. A group may contain several different items or child groups. |
|
Move Up |
Moves the selected item or group up in the collection. |
|
Move Down |
Moves the selected item or group down in the collection. |
|
Move Left |
Moves the selected item or group one level up in the hierarchy. |
|
Move Right |
Moves the selected item or group one level down in the hierarchy. |
Editor |
||
|
Save |
Saves all changes and closes the editor. Any changes cannot be undone after this point. |
|
Cancel |
Closes the editor without saving any changes. |


7.3. Accounts Editor
The accounts editor is used to manage all accounts. An example of this editor is shown in Fig. 7.2. Accounts can be used for credit cards, checking, savings and other forms of transaction-based information.
Please see the below terms useful to understand when reading this section:
- Account
A collection of transactions recording a balance over time. Types of accounts included checking, savings, cash, investment, etc. Each account contains a list of credit or debit transactions with a specific amount and date/time of occurrence. Accounts are usually held with a financial institution
- Financial Institution
A bank, credit union, credit card company, investment firm or other company that manages financial information or provides monetary services. These companies usually manage accounts and facilitate transactions for deposits, withdrawals, loans and the like.
|
|---|
|
Fig. 7.2 Accounts editor¶ |
Selecting an account in the editor’s collection will allow editing the properties listed in the next sections.
7.3.1. Account Properties
The account section contains properties specific to the account itself.
- Name
A name used to identify the account. This should usually follow the name given by the financial institution.
- Number
A number used to identify the account. This number is assigned by the financial institution and is used in addition to an IBAN in regions that support both.
- IBAN
The International Bank Account Number (IBAN) used to identify the account. This number is assigned by the financial institution. This number was originally developed by and for the European banking system. For more information see the IBAN Wikipedia article.
- Type
A classification of the account that describes how it is used and the type of transactions it contains.
Undefined : No type has been specified. This is the default value.
Cash : The account is used for cash transactions and is not usually managed by a financial institution.
Certificate of Deposit : The account represents a certificate of deposit (CD) used to earn a higher interest rate over a fixed duration.
Checking : The account is used for general-purpose checking. This account type is usually specified by the financial institution. Checking accounts commonly have debit cards or checkbooks with which to make withdrawals.
Credit Card : The account contains credit transactions. Credit card accounts have a credit card used to make withdrawals. Withdrawals are a loan that must be payed back.
Credit Line : The account can be used for credit but must be payed back with interest. This type is intended for businesses and not usually used by individuals.
Money Market : An account similar to checking but that is backed by very short term investments.
Savings : The account is used for savings. Savings accounts generally earn meaningful interest on deposits and have limits on the number of transactions allowed within a time period. This account type is usually specified by the financial institution.
- Description
Any descriptive text to explain or describe the usage of the account.
7.3.2. Financial Institution Properties
The financial institution section contains properties specific to the financial institution (bank, credit union, credit card company or similar) that contains or manages the account.
- Name
The name of the financial institution (bank, investment firm, credit card company, credit union, etc.).
- Routing Number
A number or code used to identify a financial institution. This is generally only used in the United States for the nine-digit ABA routing transit number.
- Branch ID
The financial institution’s branch ID/number or branch transit number. This is not commonly used in the United States.
- Swift Code
The Society for Worldwide Interbank Financial Telecommunication (SWIFT) code or Business Identifier Code (BIC) identifying the financial institution. For more information see the Wikipedia article for ISO 9362.
7.3.3. Transaction Properties
The transaction section contains properties that will correspond with transactions in the account.
- Currency
A three-digit alphanumeric code used to identify a currency. This currency code follows international standards defined in ISO 4217. Example: ‘USD’ for United States dollar or ‘EUR’ for the euro. See ISO 4217 or the Wikipedia article for a list of supported codes. All transactions in the account will use this currency code.
- Scale
Specifies the decimal precision or number of decimal places used in amounts. This corresponds with the “minor unit” specified in ISO 4217. This should only be modified by advanced users.
- Template
Specifies the default transaction template to use when creating new transactions in the account. This should only be modified by advanced users. See Transaction Templates Editor for more details.
7.4. Budgets Editor
Attention
Some or all of this functionality may not be available on certain platforms or may require an additional feature upgrade. Feature upgrades are available as in-app purchases on supported platforms.
Hint
This section is focused on creating and modifying budgets and goals. To see how budget progress is visualized, refer to the dashboard Budget widget.
The budgets editor is used to manage all budgets and budget goals. A budget is essentially a named list of goals. Budgeting is used to track spending and savings over a period of time to determine if the goals are being achieved. An example of the budgets editor is shown in Fig. 7.3.
Please see the below terms useful to understand when reading this section:
- Budget
A named collection of spending or savings goals used to track finances. A budget is useful to measure target versus actual spending or savings over a period of time.
- Budget Goal
A specific spending or savings goal used for budgeting. A goal includes all criteria including amount, time period and field data used to track a specific aspect of the financial information.
- Field
The most basic representation of data within a transaction. Many different types of fields for date/time, amount, description, etc. make up a transaction.
|
|---|
|
Fig. 7.3 Budgets editor¶ |

Each budget has a list of goals. This list of goals can be managed using the following actions.
Icon |
Action |
Description |
|---|---|---|
|
Add Goal |
Adds a new goal to the list. This goal will have default property values that will need to be updated by the user. |
|
Remove Goal |
Removes the selected goal from the budget. Any changes to this goal will be lost. |
Selecting a budget in the editor’s collection will allow editing the properties listed in the next sections.
7.4.1. Budget Properties
The budget section contains properties specific to the budget itself.
- Name
Any name used to identify the budget. This should be as descriptive as possible and describe the types of goals in the budget.
7.4.2. Budget Goal Properties
The budget goals section contains properties that apply only to goals within a budget. Remember that a budget contains a list of goals.
- Goal Type
Defines the type of the goal and whether it will be used to track spending (expenses) or saving (income). The type is used to determine the sign of the amount.
Spending (Expenses) : The budget goal will track only expenses with a negative amount. The amount of the goal will represent a spending limit.
Saving (Income) : The budget goal will track only income with a positive amount including zero. The amount of the goal will represent a savings target.
- Period
The period of time the goal applies to. This period of time can be set to one of the following values:
Weekly : The budget goal will be calculated on a weekly basis. The amount represents a one week (7 day) goal.
Monthly : The budget goal will be calculated on a monthly basis. The amount represents a one month (4 week) goal.
Quarterly : The budget goal will be calculated on a quarterly basis. The amount represents a one quarter (3 month) goal.
Yearly : The budget goal will be calculated on a yearly basis. The amount represents a one year (12 month) goal.
- Field
The specific field the goal will track. The list of possible Field Data values will be generated for this field.
- Field Data
The exact field value the goal will track. Transactions will be matched against this field data and the amount of matching transactions within the time period will be summed.
Hint
After selecting a Field, it will be possible to select any Field Data value used within transactions for this field. For example, assume the “Category” field has been selected. It will then be possible to select “Food & Drink > Restaurants” as the field data to be tracked by the goal. It is also possible to select only the parent category to include all children. For example, select “Food & Drink” to include all restaurants, groceries, snacks, etc.
- Amount
The numerical goal amount. This amount is the spending limit or savings target within the period. It is possible to select any currency code; however, make sure the code matches with the accounts and transactions desired to track with the goal.
Note
The amount has no sign and is always positive when being updated. The sign of the amount will be automatically determined from the goal type.
7.5. Reminders Editor
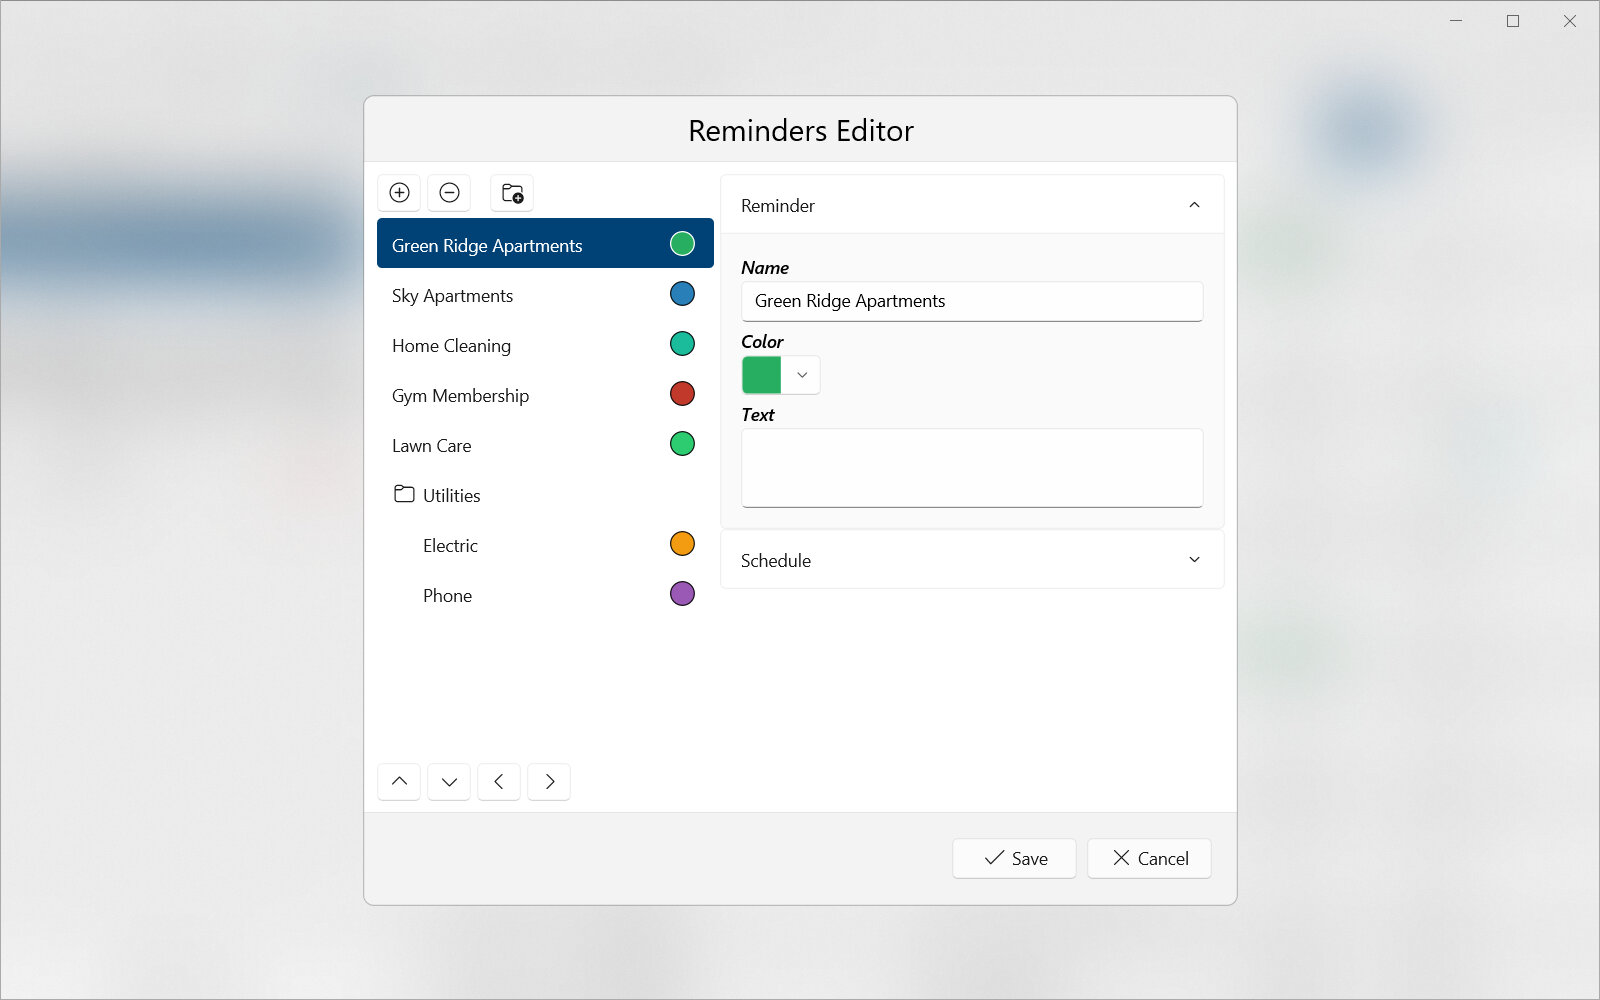
The reminders editor is used to manage all reminders. An example of this editor is shown in Fig. 7.4. Reminders are most useful when shown on the Calendar View and can be used to track upcoming or past events such as due dates.
Please see the below terms useful to understand when reading this section:
- Reminder
A scheduled event that will occur on the calendar and that represents something to remember. Reminders are useful to record upcoming bills or tasks.
|
|---|
|
Fig. 7.4 Reminders editor¶ |
Selecting a reminder in the editor’s collection will allow editing the properties listed in the next sections.
7.5.1. Reminder Properties
The reminder section contains properties specific to the reminder itself.
- Name
Any name used to identify the reminder. This should be as descriptive as possible and describe the event this reminder is for.
- Color
Defines a color to associate with the reminder. The color is most useful in the Calendar View to better differentiate and locate the reminder. For full information on how to modify schedule properties refer to the Color Picker section.
- Text
Any text to associate with the reminder. This can be used for notes or to describe in more detail what the remainder is for.
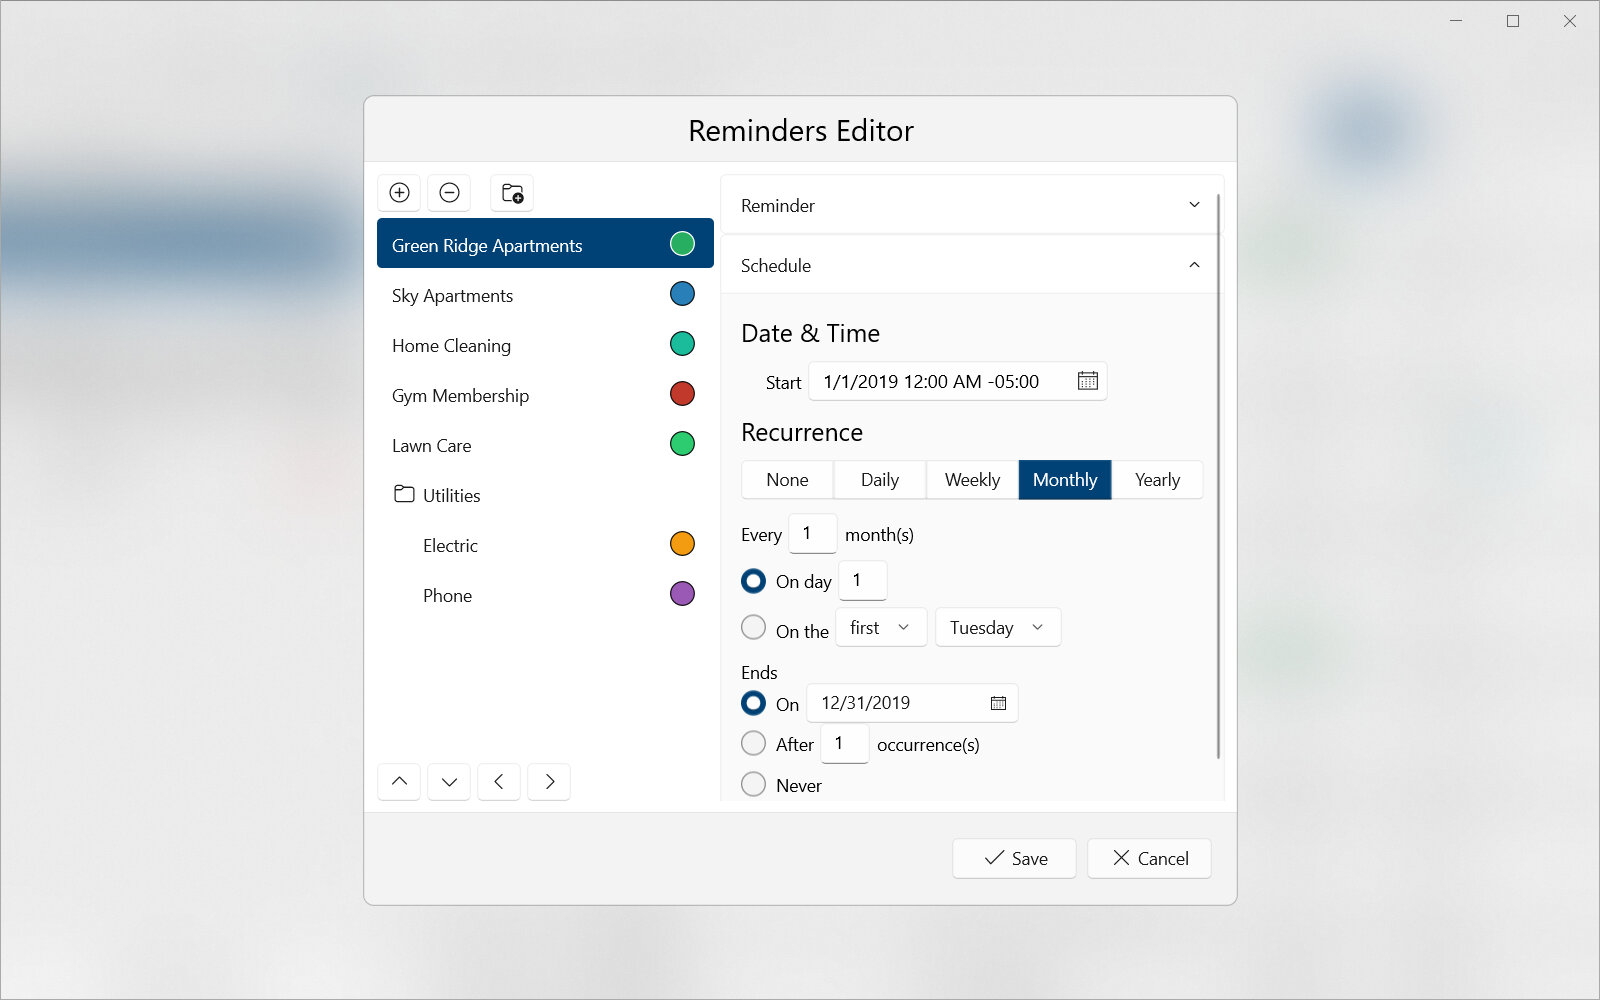
7.5.2. Schedule Properties
The schedule section contains properties used to describe when the reminder occurs (and when it is shown on the calendar). An example of the schedule is shown in Fig. 7.5. For full information on how to modify schedule properties refer to the Schedule Editor section.
|
|---|
|
Fig. 7.5 Reminders editor - schedule¶ |
7.6. Transaction Editor
The transaction editor is designed differently from other editors. Other editors can modify multiple items; however, the transaction editor is used to modify a single transaction only. It has been streamlined to make editing a transaction as straightforward as possible while providing advanced capabilities like transaction splitting. An example of the transaction editor is shown in Fig. 7.6.
Please see the below terms useful to understand when reading this section:
- Transaction
A record of assets or liabilities moving from one location (originator) to another (responder). Transactions usually occur between accounts of a buyer and seller but may also be a transfer between accounts of the same entity. All transactions should contain at minimum a date/time and amount field.
- Transaction Split
Part of a transaction that has been divided into several separate pieces with differing amounts. A single transaction can contain multiple splits. Splits are useful when a transaction originates from a single source but should be categorized more than one way.
- Field
The most basic representation of data within a transaction. Many different types of fields for date/time, amount, description, etc. make up a transaction.
|
|---|
|
Fig. 7.6 Transaction editor - Fields view¶ |
In addition to the common Save and Cancel actions described in Common Actions, the transaction editor has an action to delete the transaction from its account.
Icon |
Action |
Description |
|---|---|---|
|
Delete |
Permanently deletes the transaction and closes the editor. A warning will appear before deleting the transaction. |

There are two views in the transaction editor: the fields view used to edit fields and the splits view used to edit splits. Each of these views is further described in the following sections. Accessible in both views are controls to modify the transaction properties.
7.6.1. Transaction Properties
There are several transaction properties that can be edited separately from fields and splits. These properties include information on how to display the transaction as well as if it is linked (a transfer). The transaction editor supports editing these properties using the controls in the bottom right of the view above the Save and Cancel buttons.
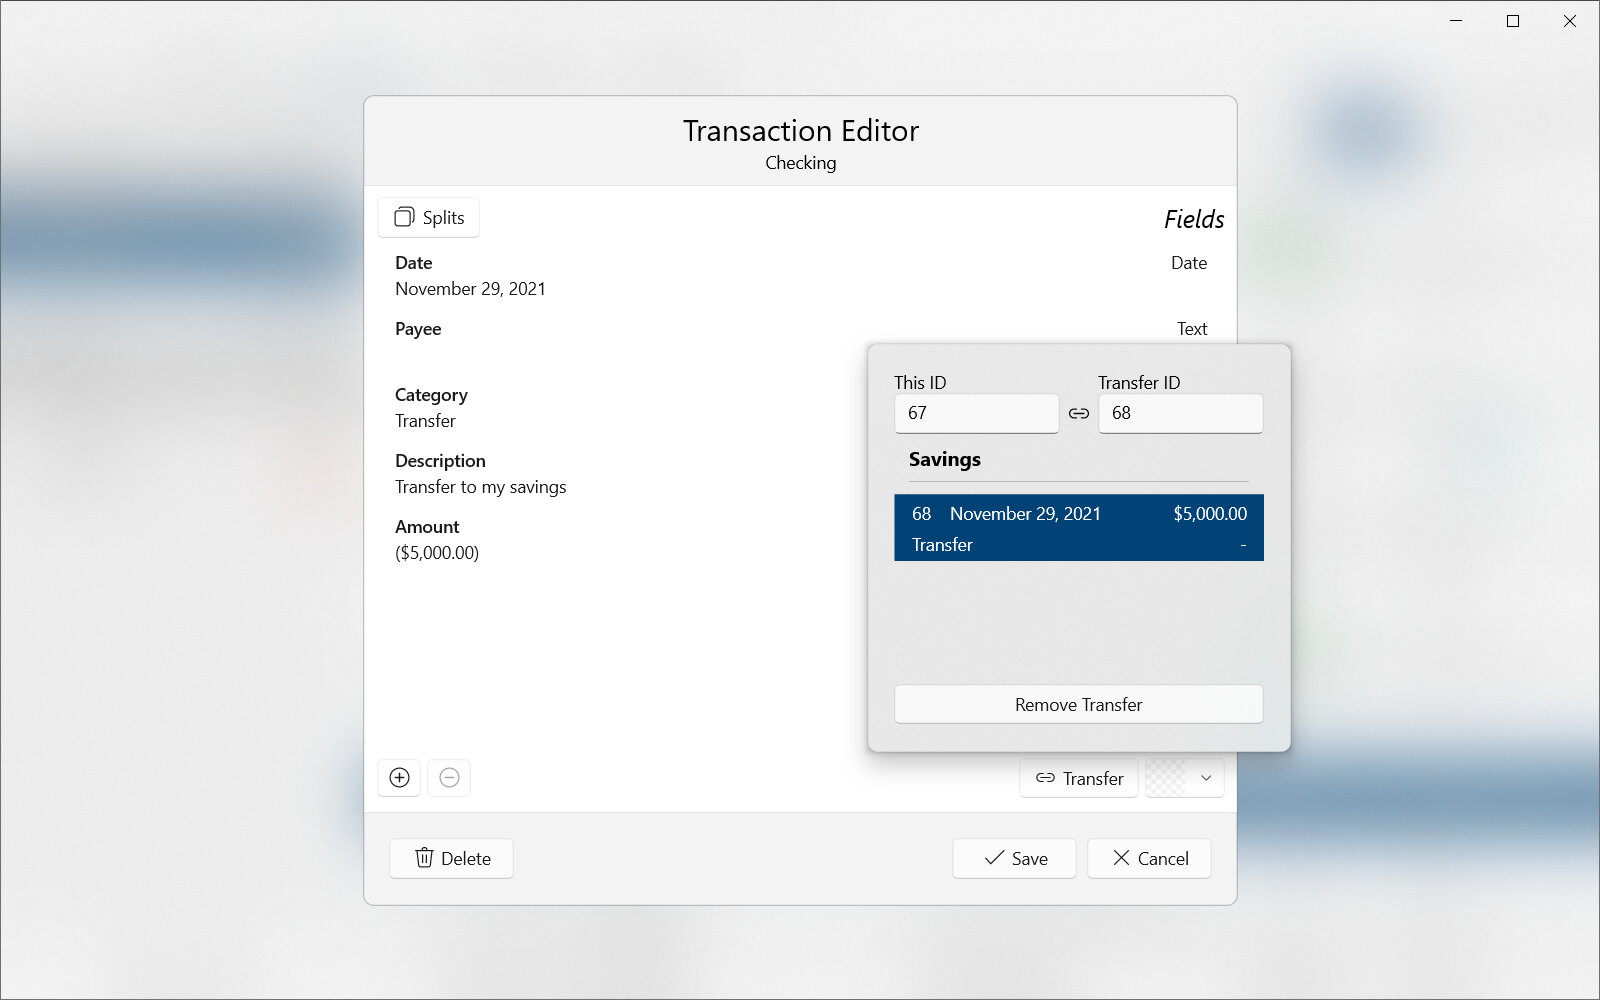
- Transfer
Specifies another transaction that is linked to this transaction. Both transactions linked together represent a transfer. Linked transactions will appear with a
 symbol. An example of linking a transaction for a transfer is shown in Fig. 7.7.
Important
In order for transactions to be linked together, they must have equal but opposite amounts and be in different accounts. For example, a transaction with an amount of -$20.00 USD can be linked with a transaction in another account with an amount of $20.00 USD. Transactions with similar dates and opposite amounts are automatically listed and can be selected to link to. It is also possible to manually enter a transaction identifier in the Transfer ID text box (the link will not be set if the amount or account is invalid).
|
|---|
|
Fig. 7.7 Transaction editor - transfer property¶ |
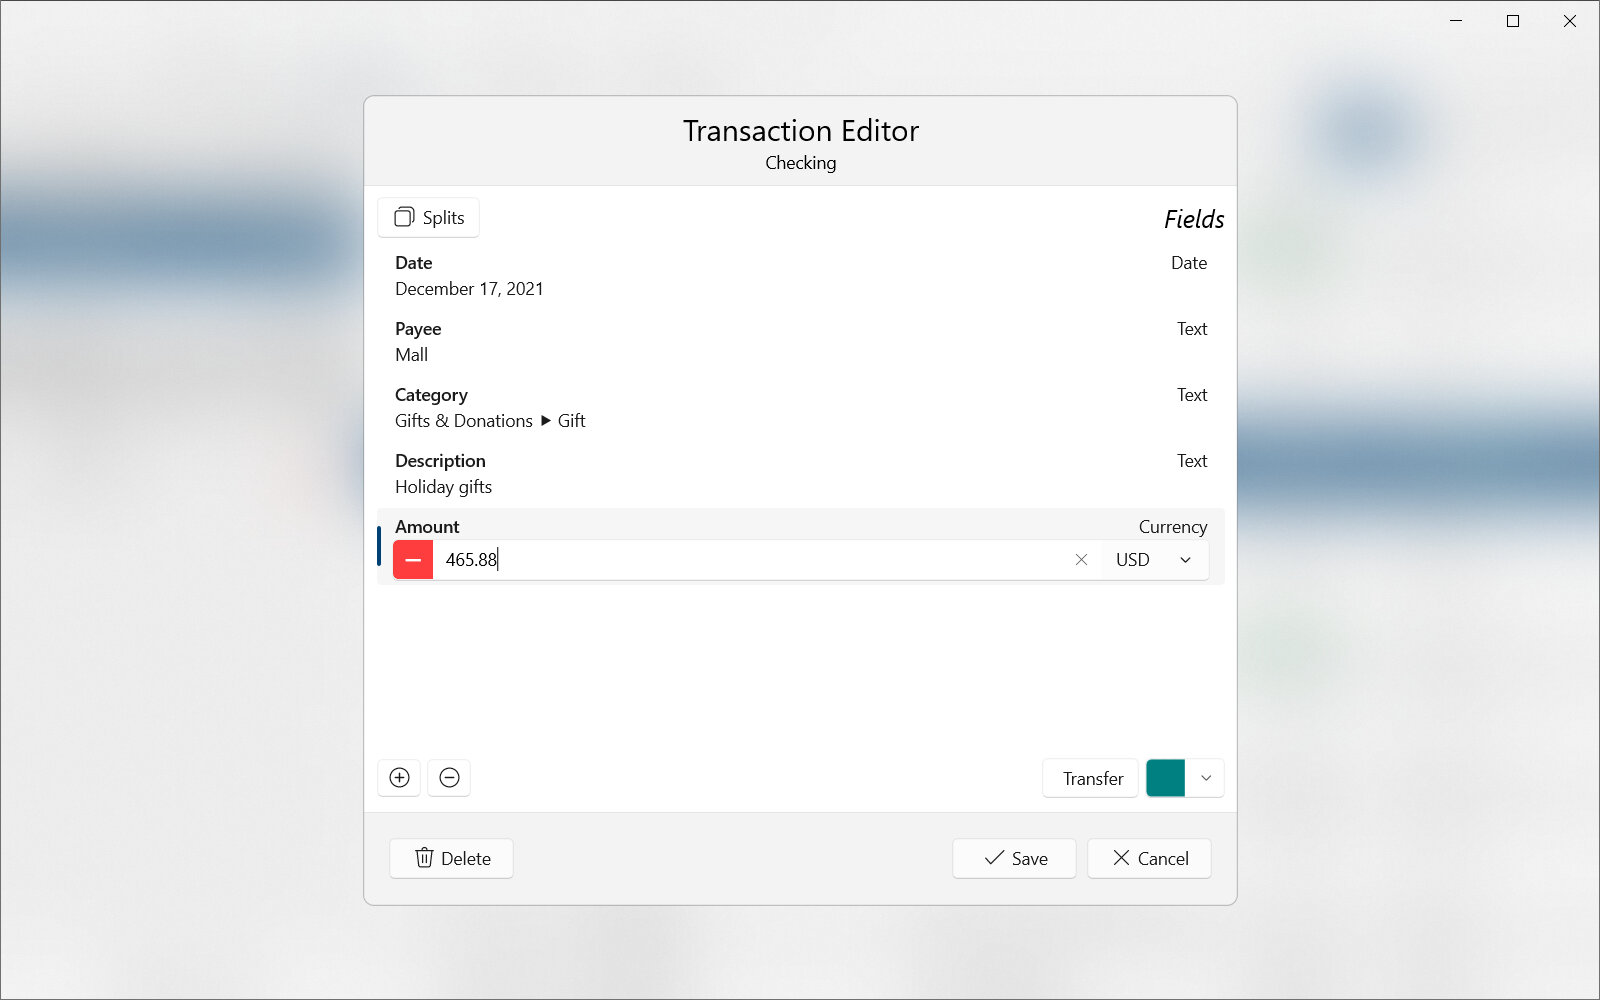
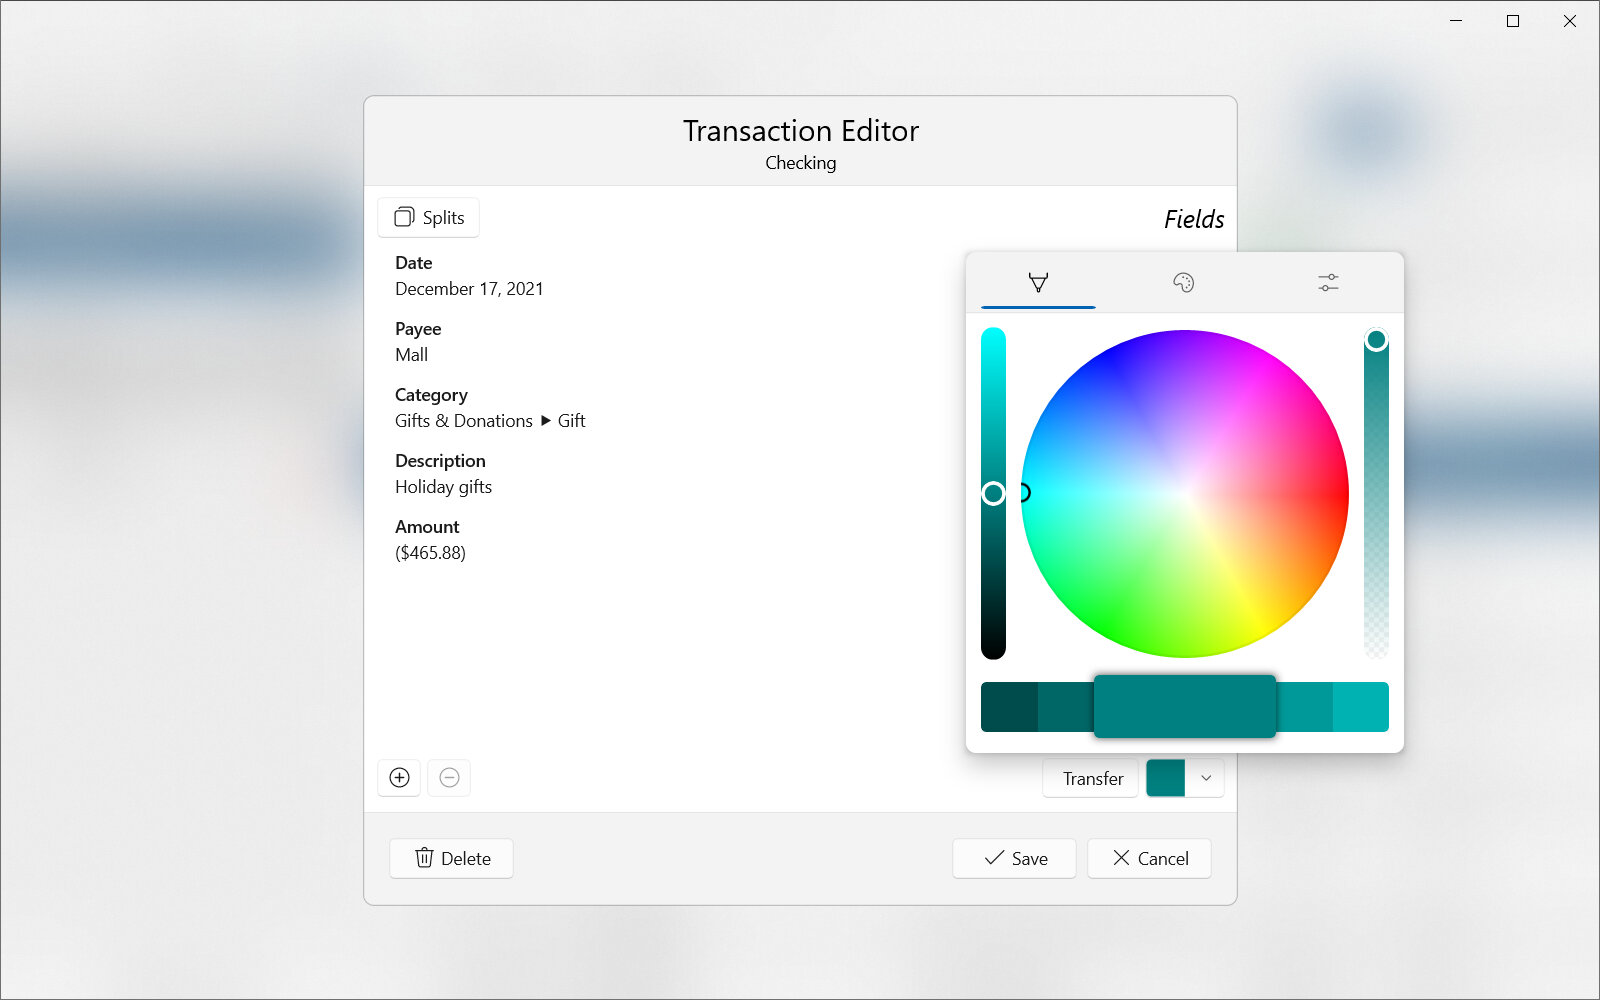
- Color
Specifies a color to assign to the transaction when it is being displayed. The color is useful to visually identify transactions when viewed as part of a list. To edit the color, press on the color picker and assign a color in the popup. For more information see the Color Picker section. An example of editing a transaction color is shown in Fig. 7.8.
|
|---|
|
Fig. 7.8 Transaction editor - color property¶ |
7.6.2. Fields Editor
Editing fields is done in the fields view of the transaction editor. This view should be considered the default and will be the first view available when opening any transaction that isn’t already split. An example of editing fields is shown in Fig. 7.9.
Important
Transactions should be created using the default transaction template specified by the account. The default template should include all fields that are common for transactions. This saves time by automatically adding empty fields instead of having to manually add fields in every new transaction.
|
|---|
|
Fig. 7.9 Transaction editor - editing fields¶ |
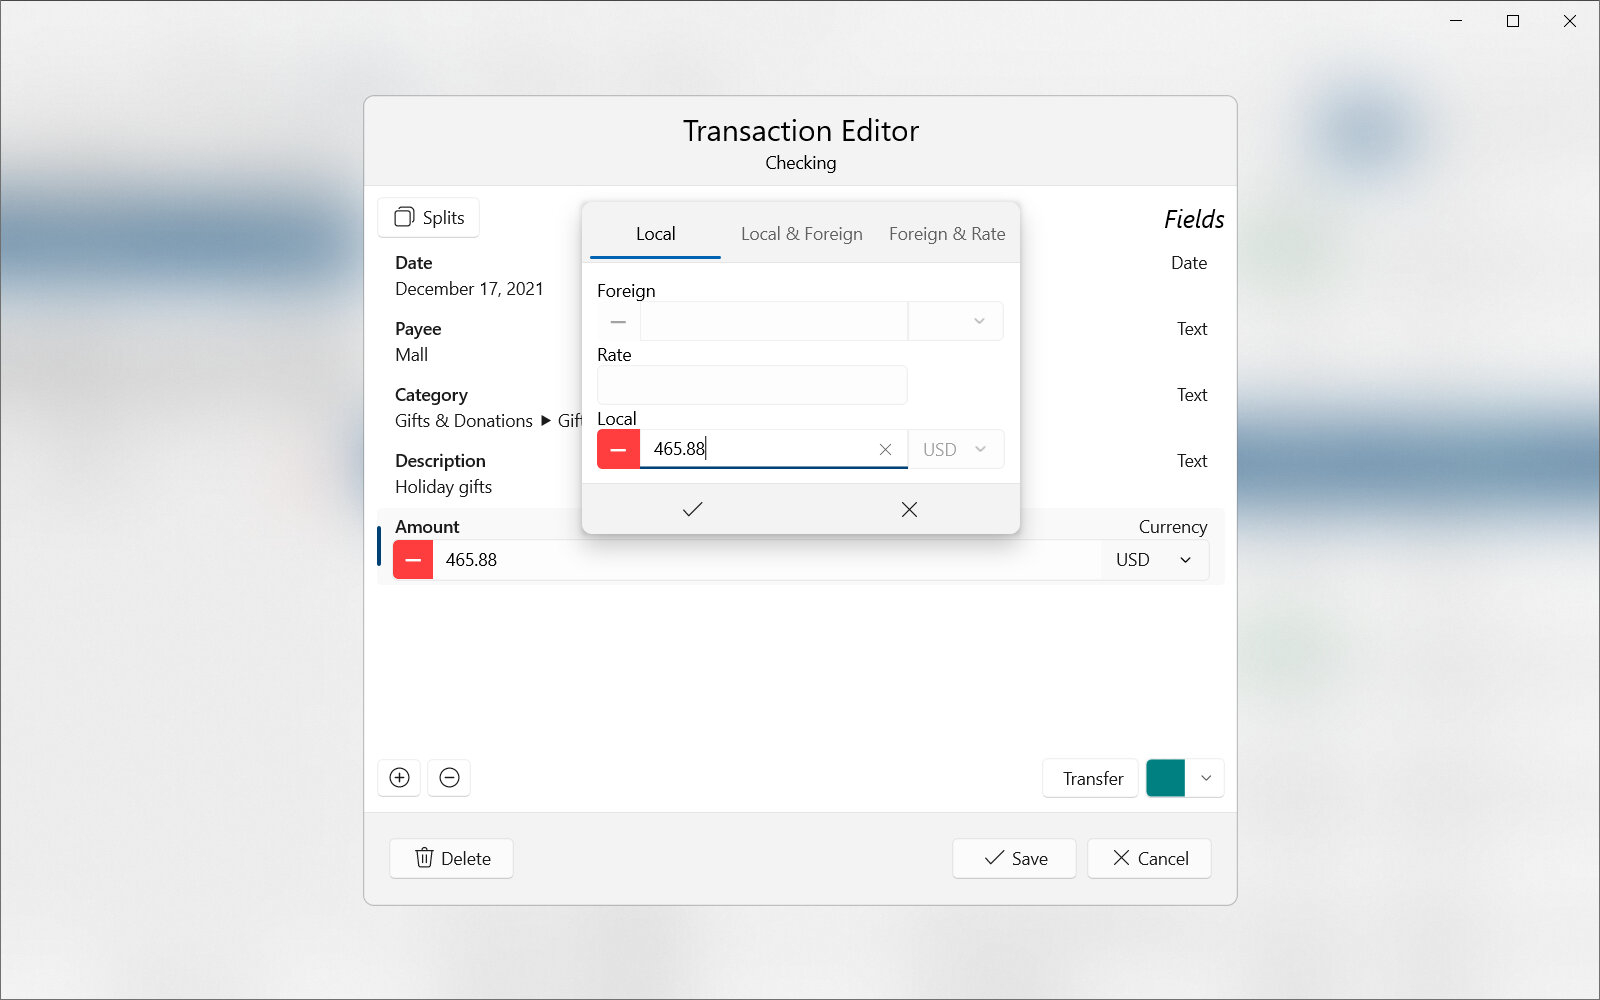
A list is displayed of all fields currently in the transaction along with their data values. A field can be selected in the list to modify its value. Here all common transaction fields such as date, category, description and amount can be modified.
Hint
See the Currency Box section for more detailed instructions on how to edit transaction amounts.
Below the list are two actions used to add or remove fields from the transaction. Above the fields list is the Splits button used to go to the splits view.
Icon |
Action |
Description |
|---|---|---|
|
Add Field |
Adds a field to the transaction with an empty data value More than one field can be added at a time. Only fields not already in the transaction are allowed. |
|
Remove Field |
Removes the selected field and its value from the transaction. |
|
Splits |
Goes to the splits view used to edit splits. |

7.6.3. Splits Editor
Editing splits is done in the splits view of the transaction editor. This view is available by pressing the Splits button within the fields view. An example of editing splits is shown in Fig. 7.10.
|
|---|
|
Fig. 7.10 Transaction editor - editing splits¶ |
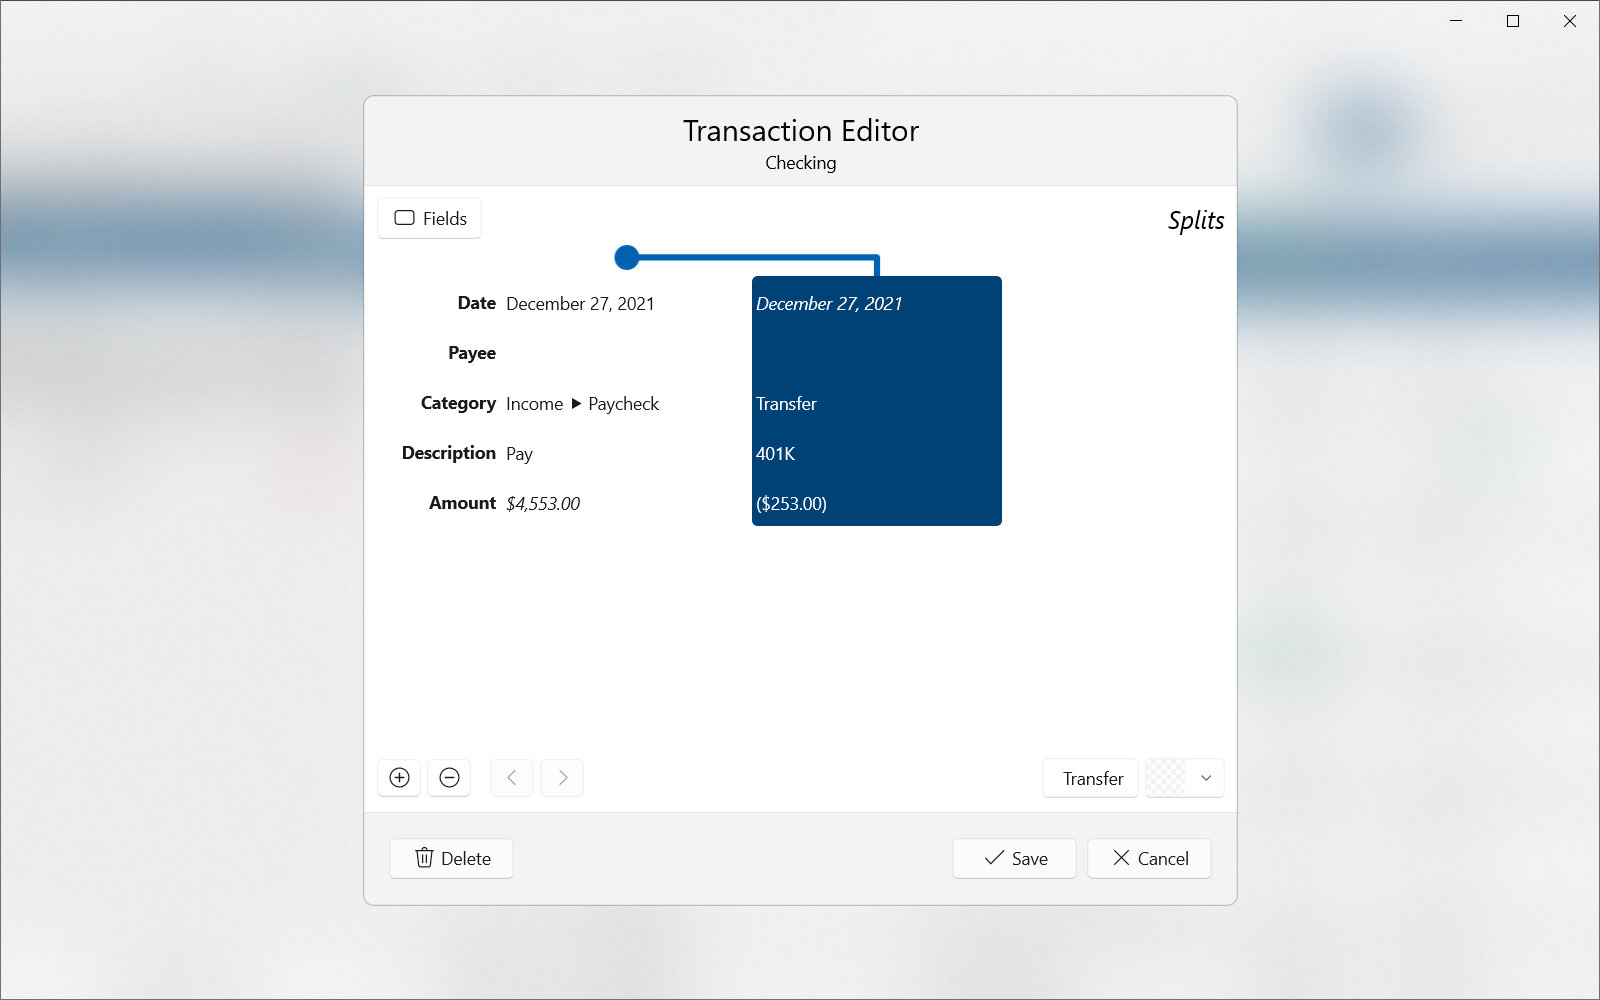
Transaction splits are useful to divide a single transaction into several pieces that can be separately categorized with different amounts. Each split takes a piece of the amount from the original transaction. A split can be added to the selected parent transaction by pressing the  button (further explained in the actions list below).
Each split can be edited individually (in the fields editor) by double pressing it or by pressing Fields. A split will inherit all parent transaction fields and values except for amount. The transaction amount is specially calculated by subtracting the total split amounts from the original transaction amount. In this way, the amount of a split influences the amount of its parent. All transactions and splits must be given an amount field value.
Note
For advanced users, the original parent transaction amount is recalculated with splits as follows.
Or, written another way:
Where
Acalculated represents the recalculated amount of a transaction (parent) adjusting for the amounts of all splits (children).
Aoriginal represents the original amount of a transaction (parent) usually from the financial institution.
Asplit represents the amount of a split (child).
#Splits represents the total number of splits (children) in a transaction (parent)
Below the split table are actions used to modify how the transaction is split.
Icon |
Action |
Description |
|---|---|---|
|
Add Split |
Adds a split to the transaction at the currently selected position. |
|
Remove Split |
Removes the selected transaction split along with all of its field values. |
|
Move Left |
Moves the selected split backward in the ordering. This is useful to control the sequence of splits when displayed. |
|
Move Right |
Moves the selected split forward in the ordering. This is useful to control the sequence of splits when displayed. |
|
Fields |
Opens the transaction split in the fields editor to modify the fields and their data values. |

7.7. Field Definitions Editor
Attention
Some or all of this functionality may not be available on certain platforms or may require an additional feature upgrade. Feature upgrades are available as in-app purchases on supported platforms.
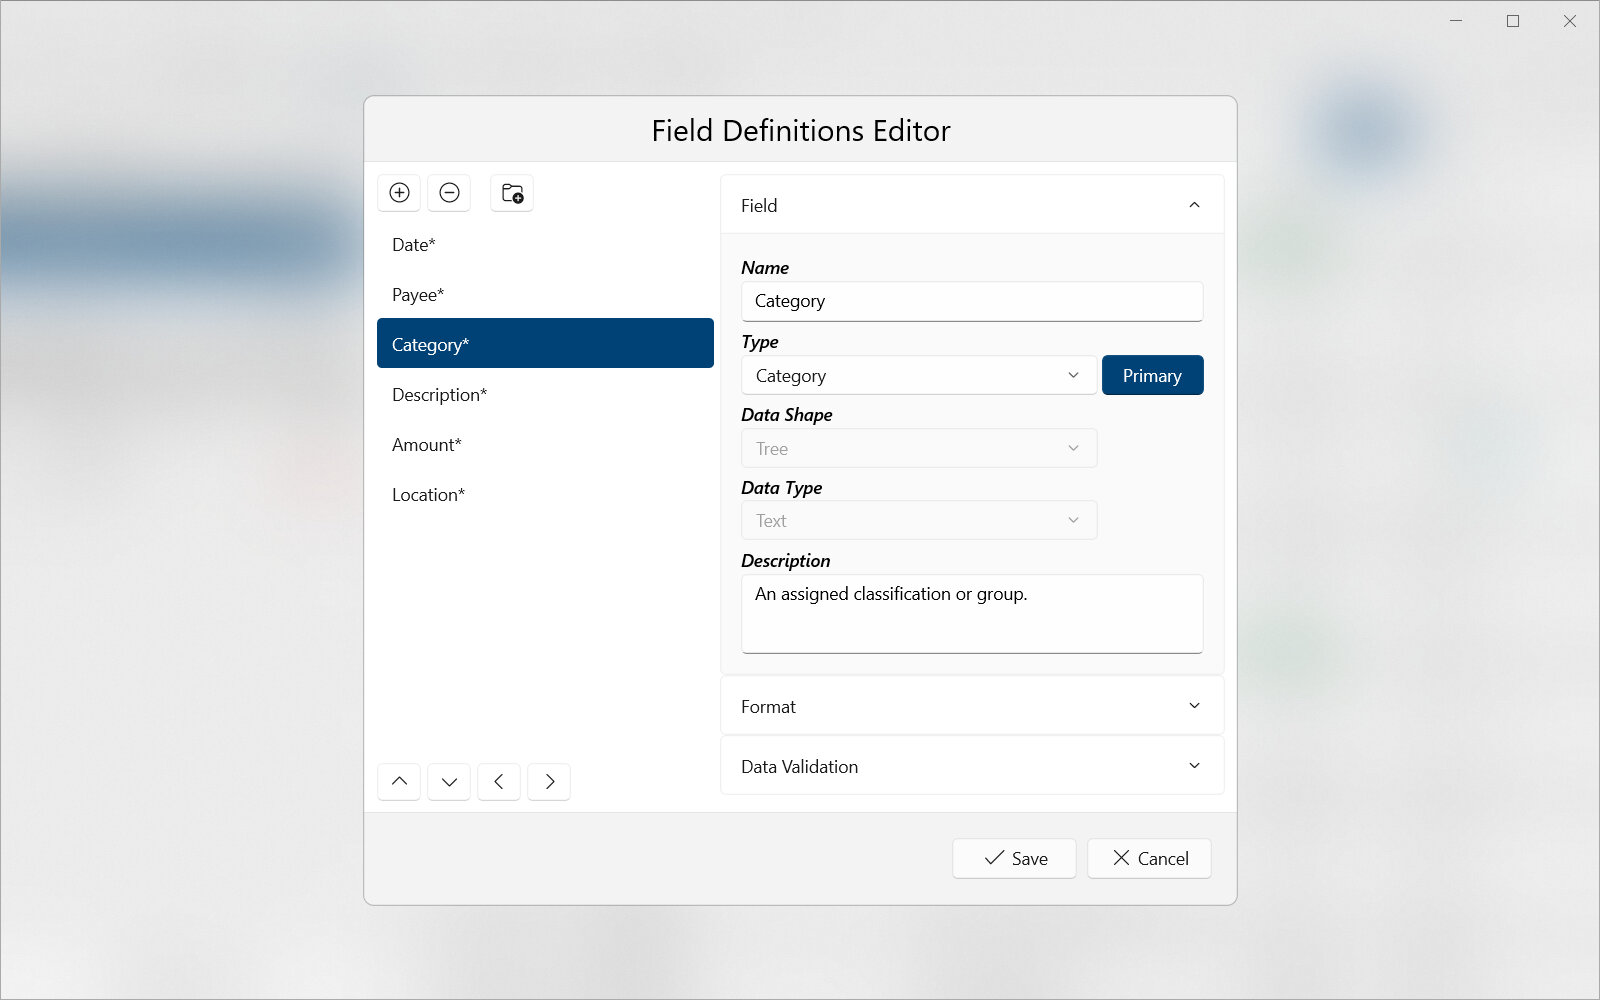
The transaction field definitions editor is used to manage all field definitions. An example of this editor is shown in Fig. 7.11. A field definition identifies a transaction field and defines properties such as which type of data will be stored in the field. Editing and managing field definitions is an advanced topic. For most users it is better to leave the default values unchanged.
Note
It is important to understand the difference between a field and a field definition. While a field exists within a transaction and contains data, a field definition contains properties used to describe the field. In other words, a field definition identifies a field.
Please see the below terms useful to understand when reading this section:
- Transaction
A record of assets or liabilities moving from one location (originator) to another (responder). Transactions usually occur between accounts of a buyer and seller but may also be a transfer between accounts of the same entity. All transactions should contain at minimum a date/time and amount field.
- Field
The most basic representation of data within a transaction. Many different types of fields for date/time, amount, description, etc. make up a transaction.
- Field Definition
Defines properties such as data type and name used to describe a transaction field. The definition is used to define and identify a field.
|
|---|
|
Fig. 7.11 Transaction fields editor¶ |
Selecting a field definition in the editor’s collection will allow editing the properties listed in the next sections.
7.7.1. Field Properties
The field section contains properties specific to the field definition itself.
- Name
Any name used to identify the Field. This should generally describe the type of data that will be stored in the field. Examples include ‘Payee’ and ‘Category’.
- Type
Defines, conceptually, what the field data represents. This type information is used by Curensee to determine how and where the field should be used. Curensee will use the first field definition of a type as needed unless the type is defined as Primary (to define as primary, press the Primary button by the type). Only one primary field definition can exist for each type and it will take precedence over all others. Primary types should exist for at least ‘Amount’ and ‘DateTime’ information. The following field types are defined with a description of the field data they represent:
Undefined : No type has been specified. This is the default value.
Amount : The credit or debit amount used in calculations.
Category : An assigned classification or group.
CheckNumber : A check number or other number assigned by the financial institution.
DateTime : The date (and optional time) of occurrence used in calculations.
Description : A descriptive comment or memo that may be assigned by the financial institution.
Location : A geographic position or address representing the location of occurrence.
Payee : A person or organization to whom the amount was paid or received from. This is the transaction partner.
Important
The type is important to set accurately. It tells Curensee how the field should be used in several places such as the dashboard. For example, the Pie Chart will only allow visualizing fields of the Category type.
- Data Shape
Defines the shape of data that will be stored in the field. Shaped data can be used to store more than one value and also to contain hierarchial (parent/child relationship) information. Three data shapes are supported:
Single : There is a single data value (one dimension). This is the most common shape and should be used in most situations.
List : There are multiple data values with sequential relationships (two dimensions).
Tree : There are multiple data values with hierarchical relationships (three dimensions). Data values in a tree may have a parent and children. This data type is most useful for categorical information.
Warning
This property can only be changed when the field is first created.
- Data Type
Defines the type of data that will be stored in the field. The following data types are supported:
Address : A geographic location defined with human-readable text. This is commonly a mailing address.
Boolean : A three-state boolean value either true, false or undefined. This is generally for advanced users.
Currency : A numerical currency of any amount and currency code. A currency may also contain information in both a local and foreign amount (see Currency Box).
Date : A calendar date without time information. The date will include a year, month and day components.
DateTime : A calendar date and time relative to Coordinated Universal Time (UTC) including time zone information. The date will include year, month and day components. The time will include hour, minute, second and time zone components.
GeoPosition : A geographic location defined with latitude and longitude coordinates.
Number : Any real number that can include decimal places. The number does have minimum and maximum precision but limits are generally far outside of normal values.
Text : Any length of text. Full unicode text is allowed supporting all writing systems.
Warning
This property can only be changed when the field is first created.
- Description
Any descriptive text to explain or describe the usage of the field.
7.7.2. Format Properties
The format section contains properties describing how the field should be formatted when viewed as text. This only applies to areas of the application that can be customized such as the accounts table view. The accounts list view and transactions editor will ignore these properties.
- Font Size
Defines how large or small the field textual data will appear when displayed. The font size is specified in typographic points.
The following buttons/actions are provided to simplify changing the font size:
Icon
Action
Description

Increase Size
Increases the font size by the default increment. For example, a font size of 14 would become 16.

Decrease Size
Decreases the font size by the default increment. For example, a font size of 14 would become 12.
- Text Alignment
Defines how the textual data should be aligned when displayed. This is useful to fit all data into a container (table cell). Setting the text alignment is done visually. There are nine positional indicators that can be pressed to indicate whether to vertically align to the top, center or bottom and horizontal align to the left, center or right.
- Width
Defines the container (table cell) width used to display the field’s textual data. This is used primarily in the accounts table view and defines column width.
- Wrap Text
Whether field textual data should be wrapped into new lines to save horizontal space. This is useful to fit all data into its container (table cell).
Note
Pressing the Reset button will reset all format properties back to their default values.
7.7.3. Data Validation Properties
Data validation is used to restrict the values that can be stored in a field. This is most useful to limit values to a list or to make sure the value is never empty. It also simplifies editing transaction fields by providing a list of pre-defined values to choose from. An example of the data validation properties for editing is shown in Fig. 7.12.
Important
Data validation can be used to define a list of possible values to choose from. Therefore, data validation is used to implement transaction categories in Curensee. A list of common categories is automatically provided for the primary category field and can be user customized. This list of categories can be reset to the original values by pressing Set Default Values. Be cautious as this will also clear any custom defined categories.
|
|---|
|
Fig. 7.12 Transaction fields data validation¶ |
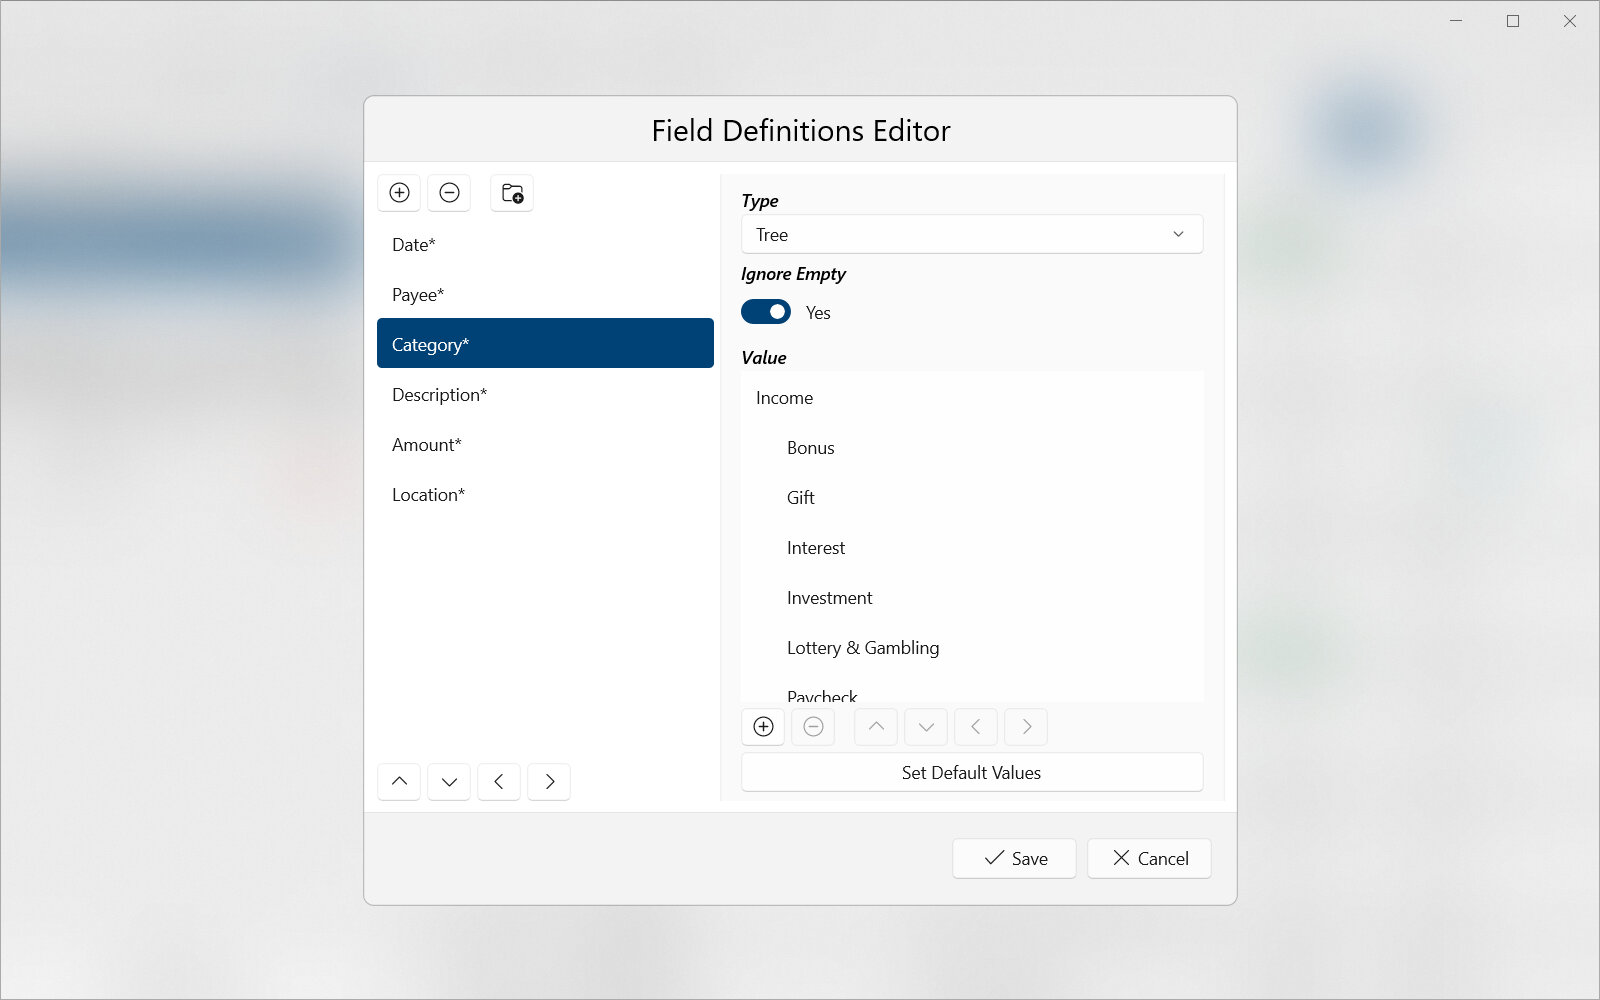
- Type
Specifies the type of data validation collection that field data will be checked against.
Any Value : Any field data value is allowed – there will be no validation.
List : A list defines the only field data values allowed. The list will be defined in the Value property below.
Tree : A tree defines the only field data values allowed. A tree contains hierarchial (parent/child relationship) information. This is useful to define categorical data values such as ‘Income > Paycheck’. The tree will be defined in the Value property below.
- Ignore Empty
Whether fields with empty data values will be ignored from data validation.
- Value
Contains the collection of values that are allowed for the field. Any field data value outside of this collection will cause a warning when the transaction is being displayed. The data validation collection has the following buttons/actions used to manage the values (see Fig. 7.12).
Icon
Action
Description
Add Item
Adds a new value to the data validation collection.

Remove Item
Removes the selected value from the data validation collection.

Move Up
Moves the value up in the collection.

Move Down
Moves the value down in the collection.

Move Left
Moves the selected value one level up in the hierarchy (left).

Move Right
Moves the selected value one level down in the hierarchy (right).
7.8. Transaction Templates Editor
Attention
Some or all of this functionality may not be available on certain platforms or may require an additional feature upgrade. Feature upgrades are available as in-app purchases on supported platforms.
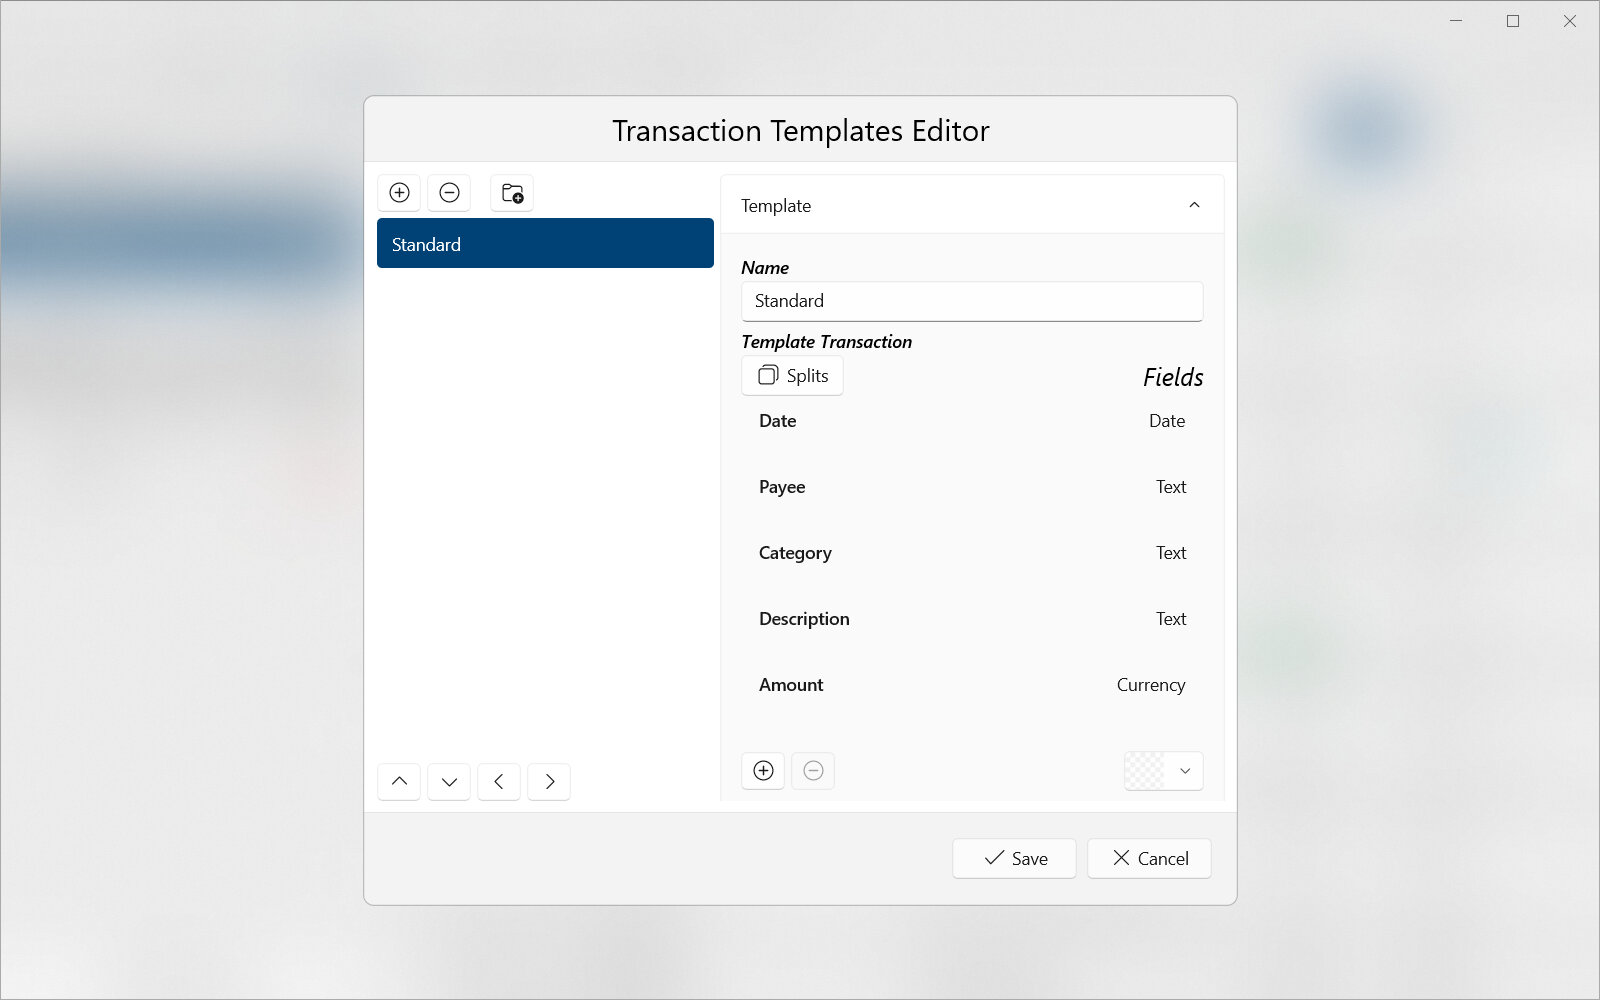
The transaction templates editor is used to manage all templates. An example of this editor is shown in Fig. 7.13. Transaction templates allow quickly creating transactions with pre-existing fields. This speeds up editing of transactions and is more intuitive for users. Editing and managing transaction templates is an advanced topic.
Please see the below terms useful to understand when reading this section:
- Transaction
A record of assets or liabilities moving from one location (originator) to another (responder). Transactions usually occur between accounts of a buyer and seller but may also be a transfer between accounts of the same entity. All transactions should contain at minimum a date/time and amount field.
- Transaction Template
A defined structure of fields and settings used to create a transaction. Templates are useful to automatically create transactions with information and data already populated.
|
|---|
|
Fig. 7.13 Transaction templates editor¶ |
Selecting a transaction template in the editor’s collection will allow editing the properties listed in the next sections.
7.8.1. Template Properties
- Name
Any name used to identify the transaction template. This should generally describe the type or purpose of the transaction that will be created by the template.
- Template Transaction
Contains the template used to create a transaction. This template looks just like a normal transaction and can be edited the same way. For more information on how to edit transactions see the Transaction Editor section.
Important
The Transaction Editor is used to modify the template the same as a normal transaction. Therefore, this section is abridged and appears simpler than it is. For full details on editing transactions (and templates) see the Transaction Editor section.