5. Cash Flow View
Attention
Some or all of this functionality may not be available on certain platforms or may require an additional feature upgrade. Feature upgrades are available as in-app purchases on supported platforms.
The cash flow view is unique in that it is used for both visualization and editing of transactions. It provides an alternative editing experience where instead of sorting transactions by account and date (as in the Accounts View), transactions are grouped together by common category and payee and separated into income/expense. These grouped transactions are shown proportionally in a hierarchical flow to visualize both where cash is coming from and where it’s going. This view is always accessible by selecting its tab at the top of the application.
In order to better understand the cash flow view, please note the following terms.
- Transaction
A record of assets or liabilities moving from one location (originator) to another (responder). Transactions usually occur between accounts of a buyer and seller but may also be a transfer between accounts of the same entity. All transactions should contain at minimum a date/time and amount field.
- Diagram Group
Usually shortened to ‘group’, a diagram group is a single node in the cash flow diagram that can be selected. Within the group are listed all related transactions that have the same field values such as category or payee.
5.1. Design & Layout
The cash flow view is primarily composed of the cash flow diagram. The cash flow diagram shows all transactions, grouped by their category and payee, in a proportional way (a derivative of the Sankey diagram). The diagram also separates income on the left and expenses on the right. This means all transactions can be visualized together to understand where cash is coming and going. An example of how this diagram may look is shown in Fig. 5.1.
Hint
Except for green and grey, expense groups are warm colors (red/orange) and income groups are cool colors (blue/purple).
The cash flow diagram is not only for viewing transactions. It is also possible to edit transactions by pressing on any group to open a list of related transactions. Double pressing any transaction in this list will then open it for editing. New transactions can also be created and will automatically have the category or payee set to place it within the selected group. More on using the cash flow diagram for editing is described below.
|
|---|

Fig. 5.1 Example cash flow diagram¶ |
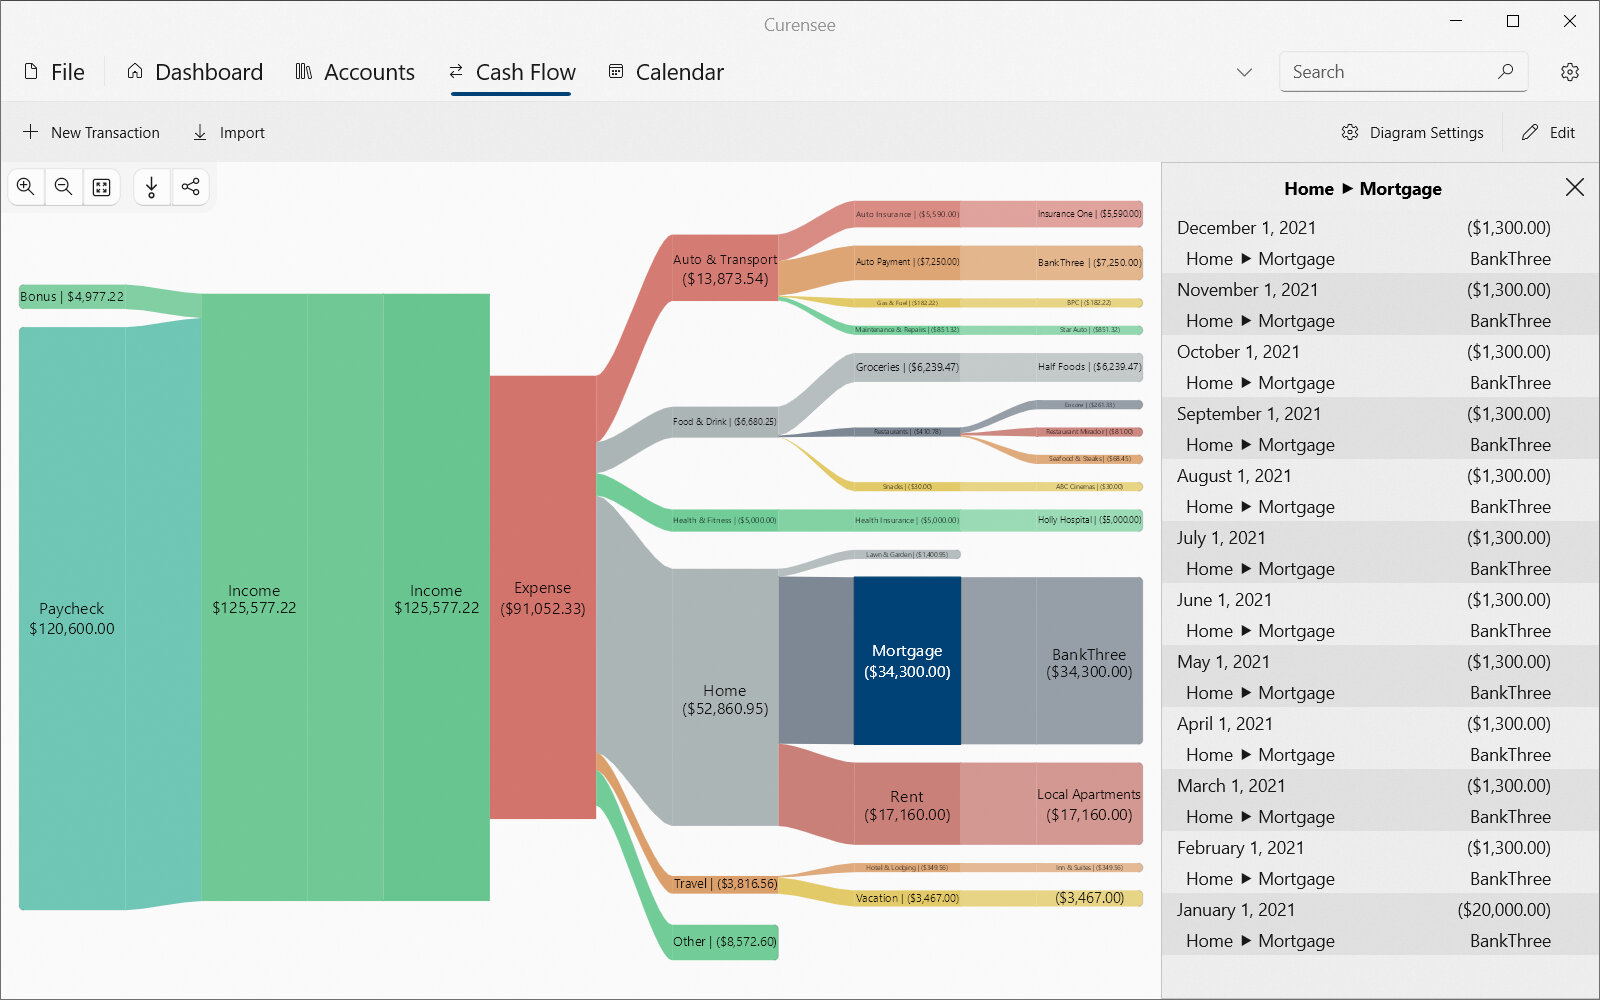
At the very top of the cash flow view, above the main content area, is the command bar. The command bar contains actions useful when working with the cash flow diagram. On the far right-side of the command bar is the Edit button (which is available in most views). Pressing this button will open the edit menu which allows for editing accounts, reminders, fields and other primary data. For further information see Command Bar Actions in Actions.
Also on the right-side of the command bar is the Diagram Settings button. Pressing this button will open the settings side pane to the right. This settings side pane controls how the diagram is calculated and displayed. For further information see the Settings section.
On the left-side of the command bar shown in Fig. 5.1 is the New Transaction button which will create a new transaction and open the Transaction Editor. Note that the new transaction will be created using the field values of the selected group. Again, see Command Bar Actions in Actions for further information.
Note
Creating new transactions in the cash flow view is generally faster than creating transactions in the account view. This is because new transactions will automatically have the category and payee set based on the selected group in the diagram.
To the right in Fig. 5.1, a list of transactions is visible in a side pane. This list of transactions will appear any time a group is selected in the cash flow diagram. It will display all transactions that are part of the group and contain the same field values.
5.2. Actions
The cash flow view has the following actions. These actions are primarily accessible from the top command bar just below the view tabs. Several interactive actions are also available within the cash flow diagram itself.
5.2.1. Command Bar Actions
Icon |
Action |
Description |
|---|---|---|
|
New Transaction |
Creates a new transaction within the selected group (automatically setting the category or payee) and opens the Transaction Editor. |
|
Import |
Open the transaction import overlay to start the process of importing transactions directly from a bank or from a file. |
|
Diagram Settings |
Opens the settings side pane used to control how the diagram is calculated and displayed. See the Settings section for more details. |
Edit Menu |
||
|
Accounts |
Opens the accounts editor. See the Accounts Editor section for more details. |
|
Budgets |
Opens the budgets editor. See the Budgets Editor section for more details. |
|
Reminders |
Opens the reminders editor. See the Reminders Editor section for more details. |
|
Fields |
Opens the transaction field definitions editor. See the Field Definitions Editor section for more details. |
|
Transaction Templates |
Opens the transaction templates editor. See the Transaction Templates Editor section for more details. |


5.2.2. Interactive Actions
Icon |
Action |
Description |
|---|---|---|
|
Zoom In |
Zooms in on the selected group or center of the diagram. This is useful to see text in smaller groups. |
|
Zoom Out |
Zooms out at the selected group or center of the diagram. |
|
Fit |
Fits the entire diagram into view. |
|
Zoom To Selection |
Zooms in or out to fit the diagram to the selected group. This button is only visible when a group is selected. |
|
Trim To Selection |
Hides all groups except for the selected group and its children. This effectively expands the branch and is useful to see finer details. This button is only visible when a group is selected. |
Select Diagram Group |
Pressing on a diagram group will select it and center it to view. Once selected, a list of all related transactions are shown in the side bar. |
|
Double Press Transaction |
Double pressing a transaction in the transactions list side bar will open it for editing in the Transaction Editor. |


5.3. Settings
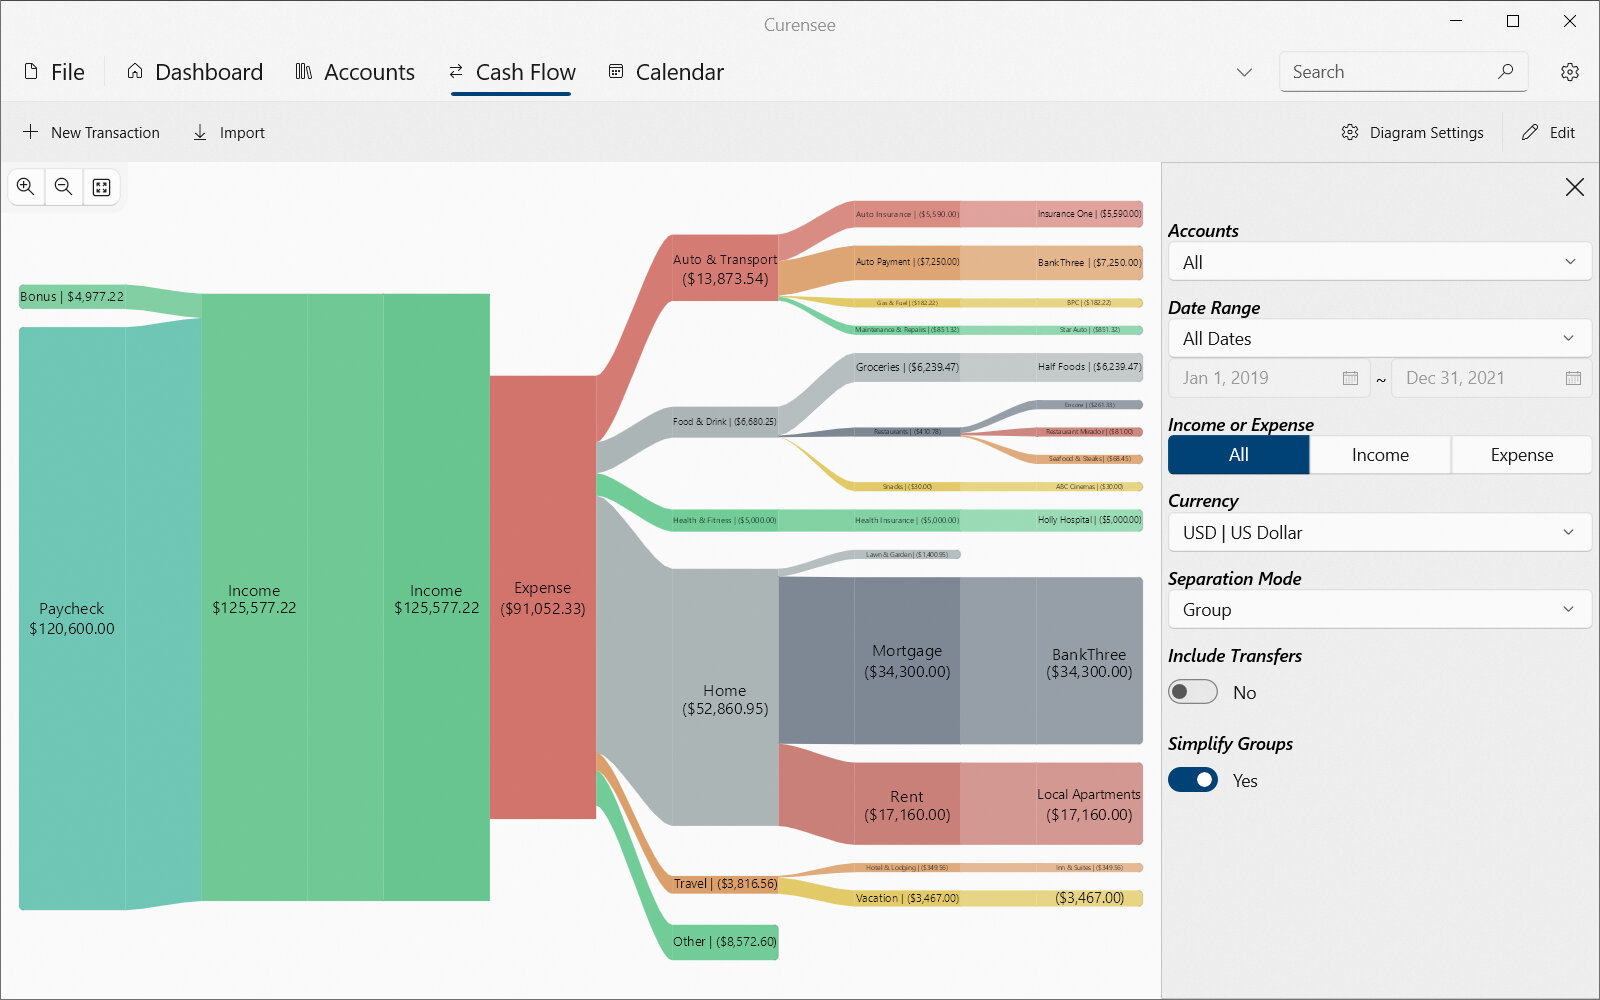
The cash flow diagram has a number of settings that can be used to customize which transactions are included and how groups are displayed. Pressing Diagram Settings in the command bar will open settings in a side pane as shown in Fig. 5.2.
|
|---|
|
Fig. 5.2 Cash flow diagram settings¶ |
The following settings may be modified:
- Accounts
Specifies one or more accounts to use in the calculation of the diagram. Only transactions or splits within the specified accounts are included. For further details on how to select multiple accounts see Selection Box
- Date Range
Specifies the range of dates to use during calculation. Transactions and splits outside of the specified date range will be excluded. For further details on how to select a date range see Date Range Picker.
- Income or Expense
Specifies whether the diagram should show only income, expense or both (all) transactions.
All [Default] : Shows all transactions including both income and expense.
Income : Shows only income (positive amount) transactions. These are typically the transactions shown on the left-side of the diagram.
Expense : Shows only expense (negative or zero amount) transactions. These are typically the transactions shown on the right-side of the diagram.
- Currency
Specifies which currency (by currency code) should be used during calculation. Only currencies that exist in the source transactions are listed.
- Separation Mode
Specifies how transactions and their groups will be classified: as either income or expense. Remember, income and expense transactions are separated and placed on the left and right sides of the diagram respectively.
Group : Separate by the group’s total amount. Once a group is assigned all of its transactions are also assigned as either income or expense. In practice this means that both negative and positive amount transactions may be together based on their total sum.
Transaction : Separate by simply assigning positive amount transactions to income and negative amount (and zero) transactions to expense. All transactions are handled separately in a straightforward way.
- Include Transfers
Specifies whether transactions that are linked with another transaction as a transfer should be included during calculation. See Transfers for further details.
- Simplify Groups
Specifies whether the number of groups in the diagram should be reduced (simplified) by combining smaller groups into a new ‘Other’ group.